SYSTEM CONFIGURATION AND MANAGEMENT
Route IP traffic and create static routes.
Configure a default routeShow routing table:
route -n
netstat -nr
0.0.0.0 in the Destination column specifies all networks.
0.0.0.0 in the Gateway column means that the network is locally connected and there is no next hop (gateway). A * indicates that no gateway has been set.
The Iface column specifies what network adapter the route uses.
To add a default gateway of 192.168.1.1 for 0.0.0.0 destination networks (all) via interface ethernet 1 (use del instead of add to remove a route):
route add default gw 192.168.1.1 dev eth1
To ensure the default route survives a reboot append the below line to either /etc/sysconfig/network or /etc/syconfig/network-script/**** where **** is the outbound network interface eg eth0.
GATEWAY=192.68.1.1
Configure a static route
Temporary static routes can be created using the below command. In this example traffic intended for the 192.168.11.0/24 network will be routed out to the gateway 192.168.122.1 via interface eth0. Routes created using this method will not survive a reboot.
route add -net 192.168.11.0 netmask 255.255.255.0 gw 192.168.122.1 dev eth0
Persistant static routes can be configured by creating the file /etc/syconfig/network-script/route-**** where **** is the outbound network interface eg eth0. Multiple static routes can be configured in the same file as per the below and will survive a reboot. This will show up in the routing table.
ADDRESS0=192.168.11.0
NETMASK0=255.255.255.0
GATEWAY0=192.168.122.1
ADDRESS1=10.1.1.0
NETMASK1=255.255.255.0
GATEWAY1=192.168.122.1
Use iptables to implement packet filtering and configure network address translation (NAT).
Packet FilteringSample iptables rule:
iptables -I INPUT -s 192.168.101.101/32 -p icmp -j REJECT
Block PING (allow other ICMP traffic:
iptables -I INPUT -p icmp -m icmp --icmp-type echo-request -j REJECT
Directly after the iptables command, you have the ‘-I’ switch followed by the word INPUT. The -I option specifies insert and INPUT is the chain name. INPUT is for incoming traffic.
With tcp or udp, you will also specify port numbers with the –dport or –sport option, depending on source or destination port. You can specify a single port like –dport 22, a range of ports like –dport 20:23, or individual ports like –dport 21,22,25.
Lastly, you decide what to do with the traffic with the -j option. The most common options are ACCEPT, DROP, and REJECT.
Add a deny all entry to iptables
Append this to the end of you iptables list to block all traffic that isn’t allow by earlier rules:
iptables -A INPUT -j drop
Configure network address translation (NAT)
First, configure the host as a router. This allows the host to route packets that are not in it's network to another gateway. Edit the "/etc/sysctl.conf" file, amending the "net.ipv4.ip_forward" entry as follows (this change will survive a reboot):
net.ipv4.ip_forward = 1
However, the above change does not take immediate effect, to make it take effect type:
echo 1 > /proc/sys/net/ipv4/ip_forward
OR
/sbin/sysctl -p
You also need to allow forwarding of packets between the networks (ie eth1 (internal) and eth0 (external)).
iptables -I FORWARD -i eth1 -o eth0 -j ACCEPT
iptables -I FORWARD -i eth0 -o eth1 -j ACCEPT
Next, enable NAT (IP masquerading) which maps internal IP addresses to a single external IP address. The below command allows NAT to access the adapter with external access (eth0).
iptables -t nat -I POSTROUTING -o eth0 -j MASQUERADE
Save your configuration:
service iptables save
Use /proc/sys and sysctl to modify and set kernel runtime parameters.
You can view all current Kernel runtime parameters using:sysctl -a
Kernel runtime parameters relate to files in the /proc/sys directory. Eg dev.cdrom.info relates to the file /proc/sysc/dev/cdrom/info. Not all files can be modified though, check with ls -l in the relevant directory. If the file is not writable by root it cannot be used to change kernel runtime parameters.
Example - prevent host from responding to ping by changing a kernel runtime parameter.
First find the relevant parameter and see if it is activated (0 is off, 1 is on):
sysctl -a | grep icmp
See if the relevant file can be modified:
ls -l /proc/sys/net/ipv4/ | grep icmp
To enable the runtime parameter immediately, change the value to a 1 using echo. Note, this will not survive a reboot.
echo 1 > /proc/sys/net/ipv4/icmp_echo_ignore_all
To make the setting survive a reboot you need to add it to /etc/sysctl.conf
vi /etc/sysctl.conf
net.ipv4.icmp_echo_ignore_all = 1
After modifying /etc/sysctl.conf type the below command to reload the config file and make any changes take immediate effect:
sysctl -p
Configure a system to authenticate using Kerberos.
Install the below:yum install pam_krb5 samba-winbind
Run the below tool:
authconfig-tui
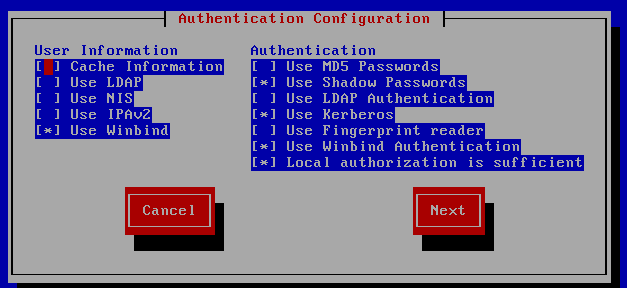
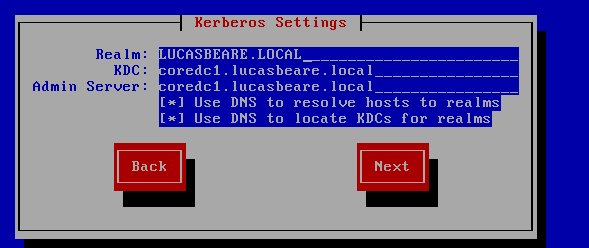
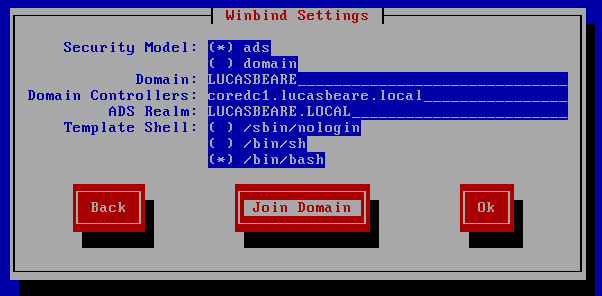
Click the "Join Domain" key and enter the relevant credentials.
Now that the computer is joined to the domain you can query AD:
wbinfo -u = lists AD users
wbinfo -g = lists AD groups
Further info:
Configure a system as an iSCSI initiator that persistently mounts an iSCSI target.
iSCSI targets are on the server side. EX300 focuses on how to set up the initiators on the client side.
Install the necessary software on the client to support iSCSI initiators:
yum install iscsi-initiator-utils
Turn on the service and make sure it starts automatically after a reboot:
service iscsi start
chkconfig iscsi on
Check for iSCSI targets on the server presenting them. In the below example the target is configured on a machine called "rhce2.localdomain". An example similar to this is in the iscsiadm man page, just search for 'example'.
iscsiadm --mode discoverydb --type sendtargets --portal rhce2.localdomain:3260 --discover
Output:
Starting iscsid:
[ OK ]
192.168.0.191:3260,1 rhce2:drive1
Restart the iSCSI service:
service iscsi restart
The iSCSI device is now visible using the fdisk -l command:
fdisk -l
Partition it and build a filesystem on it:
fdisk /dev/sdb
mkfs.ext4 /dev/sdb1
Check the UUID of the new partition:
blkid /dev/sdb1
This UUID should be used for mounting the device, thus preventing problems if device names change. Create a new mount point:
mkdir /rhce2_drive1
Add the following entry into the "/etc/fstab" file:
UUID="eac38663-e202-4920-b046-93b798db18b1" /rhce2_drive1 ext4 defaults 0 0
Mount the device:
mount /rhce2_drive1
The drive is now mounted and will be available on reboot.
Produce and deliver reports on system utilization (processor, memory, disk, and network).
yum install sysstatThis includes sar and iostat.
service sysstat start
sysstat config file:
/etc/sysconfig/sysstat
HISTORY=x sets how long to keep the log files in /var/log/sa
sysstat creates two tasks in /etc/cron.d/sysstat which populate the log files in /var/log/sa/ with historical hardware performance data. The first one runs every 10 minutes by default (stats in /var/log/sa/saxx will be recorded in 10 minute chunks). You can change this to a shorter time period like every 5 minutes.
The sysstat log files stored in /var/log/sa are named saxx where xx is the day of the month.
Use sar to search these log files to return historical hardware performance eg the below command returns CPU (-u) and Memory utilisation (-r) for the 22nd (/var/log/sa/sa22) day of the month from 1:55pm to 2:00pm.
sar -s 13:55:00 -e 14:00:00 -f /var/log/sa/sa22 -u -r
The below command returns information on CPU (-u), Memory (-r), Disk I/0 (-dp), and Network Interfaces (-n DEV):
sar -s 13:55:00 -e 14:00:00 -f /var/log/sa/sa03 -u -r -dp -n DEV
You can also use sadf to displays results in a format that can be ingested by a database (seems to be a csv file). The sadf man page has a good example of its use. sadf can be used with sar switches like the below as indicated by --
sadf -d /var/log/sa/sa21 -s 13:55:00 -e 14:00:00 -- -r -u -dp -n DEV
Some other useful performance monitoring tools
Memory:
vmstat can be used with -S m to displays usage in Mb. The below command will return 3 memory outputs with 10 second breaks in-between.
vmstat 10 3 -S m
free is also a good command ie free -m
Disk I/O:
iotop - provides a live feed of current I/O.
iostat can be used with -m to displays usage in Mb. The below command will return 3 disk I/O outputs with 10 second breaks in-between. It also shows CPU utilisation.
iostat 10 3 -m
Network:
dstat shows a live feed of CPU, Disk, Memory and Network performance.
iftop shows a live feed of network interface utilisation however this does not appear to be in the CentOS 6 repo.
Use shell scripting to automate system maintenance tasks.
Bash ScriptingConfigure a system to log to a remote system.
vi /etc/rsyslog.confFind the section for remote logging and uncomment the lines from $WorkDirectory... to $ActionResume... and also *.* @@IP:514.
This final line indicates the syslog server you want to log logs to.
*.* means all logs, you can specify individual logs eg cron.*
The @@ symbol means the client will connect using TCP.
A single @ symbol means they will connect via UDP.
Then comes the IP address/hostname of the syslog server followed by its listening port number, default 514.
Restart the client syslog service after modifying the syslog config file on the client:
service rsyslog restart
Configure a system to accept logging from a remote system.
vi /etc/rsyslog.confchkconfig rsyslog on
Uncomment the below two lines if you are listening on TCP. Add the third line if you want to create a separate log file for a particular client. By default all client logs are stored in /var/log/messages on the server.
$ModLoad imtcp
$InputTCPServerRun 514
:FROMHOST-IP, isequal, "192.168.0.101" /var/log/beares_client.log
If you are working with UDP uncomment:
$ModLoad imudp
$UDPServerRun 514
Open TCP port 514 on the server's firewall (or UDP if your using it):
iptables -I INPUT 1 -p tcp -m tcp --dport 514 -j ACCEPT
Restart the server's rsyslog service after modifying the syslog config file:
service rsyslog restart
To test that logging is working, from a client type logger sample_text. You should see the line "sample_text" appear in the /var/log/messages file on the server.
NETWORK SERVICES
Network services are an important subset of the exam objectives. RHCE candidates should be capable of meeting the following objectives for each of the network services listed below:
Install the packages needed to provide the service.
Configure SELinux to support the service.
Configure the service to start when the system is booted.
Configure the service for basic operation.
Configure host-based and user-based security for the service.
HTTP/HTTPS
Configure a virtual host.
Edit the Apache config file:vi /etc/httpd/conf/httpd.conf
Uncomment the NameVirtualHost directive to enable it.
Edit the Virtual Host section at the bottom of httpd.conf accordingly and add a second stanza for another virtual host (add more if required). Ensure that the document roots are created. Reload the httpd.conf file when done. Note the top virtual host section will be displayed by default to clients when they use the IP.
<VirtualHost *:80>
ServerAdmin webmaster@tennis.com
DocumentRoot /var/www/html/tennis
ServerName tennis.com
ErrorLog logs/tennis.com-error_log
CustomLog logs/tennis.com-access_log common
</VirtualHost>
<VirtualHost *:80>
ServerAdmin webmaster@football.com
DocumentRoot /var/www/html/football
ServerName football.com
ErrorLog logs/football.com-error_log
CustomLog logs/football.com-access_log common
</VirtualHost>
To test that virtual hosting is working, on the client set the domain names in your /etc/hosts file eg:
192.168.1.60 tennis.com
192.168.1.60 football.com
Then use elinks to test the site:
elinks tenns.com
You can also block access to individual virtual hosts by adding the location block within them. The below virtual host blocks access to clients on the 192.168.1.0/24 network:
<VirtualHost *:80>
ServerAdmin webmaster@football.com
DocumentRoot /var/www/html/football
ServerName football.com
ErrorLog logs/football.com-error_log
CustomLog logs/football.com-access_log common
<location />
Order allow, deny
Allow from all
Deny from 192.168.1.0/24
</Location>
</VirtualHost>
To verify your Virtual Host configuration run httpd -S.
Configure private directories.
With Apache you can password protect an entire web directory. Only visitors who know the username and password will be able to view the website.Start by editing your Apache configuration file vi /etc/httpd/conf/httpd.conf
Do a search for the '.htaccess' file (ESC /.htacess)
Once you find .htaccess you will see a line directly below named:
AllowOverride None
Change this to:
AllowOverride All.
Once you have edited the httpd.conf file you need to reload Apache.
service httpd reload
Next you need to create a .htaccess file in the web directory you would like to lock down. For example:
vi /var/www/html/secure_dir/.htaccess
Populate the .htaccess file with the below information:
AuthUserFile /var/www/.htpasswd
AuthName "Stop, authorised users only!"
AuthType Basic
require valid-user
Now you need to create the .htpasswd file (stored in /var/www as indicated in the .htaccess file). The username and password for the permitted user is stored here.
cd /var/www/
htpasswd -cm .htpasswd username
The 'username' specified above is the actual user ID that you will need to use when accessing the secure web directory (in this example /var/www/html/secure_dir/). You will also be asked to create the user's password. The password is hashed and stored in the .htpasswd file.
Now when you visit /var/www/html/secure_dir/ you will need to enter the required username and password to progress.
You can permit additional users by adding them to the .htpasswd file create earlier (-D will remove them):
htpasswd -m .htpasswd username2
Configuring public_html folders in user home directories
In the httpd.conf comment out 'UserDir disabled'. Uncomment 'UserDir public_html'.
Create the public_html dir in a user's home dir. Set permissions to 705 on public_html and 701 on the user's home dir (this makes it accessible over the web).
Enable httpd home dirs in selinux:
setsebool -P httpd_enable_homedirs on.
Restart the httpd service and test from a client eg http://tennis.com/~lucas
Deploy a basic CGI application.
There is a sample CGI application stored in http://localhost/manual (/var/www/manual/index.html) on Apache web servers. Under a basic RHEL 6 install make the below changes to get your CGI app working.
Make a cgi-bin directory under your website to hold your cgi app.:
mkidr /var/www/html/tennis.com/cgi-bin
Create your cgi app in the above directory with the .pl file extension. Perl file contents:
#!/usr/bin/perl
print "Content-type: text/html\n\n";
print "Hello, World.";
Find the line 'ScriptAlias', and the change "/var/www/cgi-bin/" to the location of your newly created cgi-bin dir. Also change the same location listed below in the Directory block.
vi /etc/httpd/conf/httpd.conf
You may find that you need to add the below to the above mentioned Directory block:
Options ExecCGI FollowSymlinks
Change the permissions on your cgi-bin dir and perl file to 755 so that users can access them. Also change the selinux labelling for your entire web site (including cgi) as per the below:
chcon -R -t httpd_sys_content_t /var/www/html/tennis.com
chcon -R -u system_u /var/www/html/tennis.com
Configure group-managed content.
What this means to me is a directory shared among a group of users where everyone in the group can access existing files and create new ones.
Add the group:
groupadd webdesigners
Add the relevant users to the group. You can also add users to the group by editing /etc/group
usermod -a -G webdesigners user1
usermod -a -G webdesigners user2
usermod -a -G webdesigners user3
Make the relevant website directory:
mkdir /var/www/html/site1
Give the new group permission over the directory including sticky bit allocation:
chgrp -R webdesigners /var/www/html/site1
chmod -R 2775 /var/www/html/site1
DNS
Configure a caching-only name server.
Install the named software:yum install bind bind-utils -y
Turn named on by default:
chkconfig --levels 3 named on
Open the required ports:
iptables -I INPUT 1 -m udp -p udp --dport 53 -j ACCEPT
iptables -I INPUT 1 -m tcp -p tcp --dport 53 -j ACCEPT
Save firewall changes:
service iptables save
service iptables restart
Configure named.conf:
vi /etc/named.conf
Enter the required address to listen on:
listen-on port 53 { 127.0.0.1; 192.168.1.4;};
Add the network addresses you want to allow queries from:
allow-query { localhost; 192.168.1.0/24;};
recursion yes;
Restart the service:
service named restart
Configure a caching-only name server to forward DNS queries (candidates are not expected to configure master or slave name servers).
In addition to the above steps add the below to the /etc/named/conf file to allow forwarding, where 8.8.8.8 represents the desired DNS server:forward only;
forwarders {8.8.8.8;};
FTP
Configure anonymous-only download.
Install vsftp.yum install vsftpd
Turn the service on by default.
chkconfig vsftpd on
Start the vsftpd service.
service vsftpd start
Open port 21 on the server's firewall.
iptables -I INPUT 1 -p tcp -m tcp --dport 20 -j ACCEPT
iptables -I INPUT 1 -p tcp -m tcp --dport 21 -j ACCEPT
OR
iptables -I INPUT 1 -p tcp -m tcp --dport 20:21 -j ACCEPT
vi /etc/vsftpd/vsftpd.conf
uncomment anonymous_enable=YES
To enable full write access for anonymous also uncomment:
anon_mkdir_write_enable=YES
write_enable=YES
anon_upload_enable=YES
You also need to enable the below in selinux:
setsebool -P allow_ftpd_anon_write 1
When a user connects on the FTP server with the username anonymous, that user connects on the server as a user named ftp.
cat /etc/passwd | grep ftp
Whenever an anonymous user logs in, they are taken to the ftp user's home directory /var/ftp.
You can change this in the /etc/passwd file. Note that the anonymous root directory defined in /etc/passwd cannot be writable by anonymous. If it is, anonymous will not be able to log in.
Any directory that is going to be used on read FTP operations must be labelled as public_content_t
chcon -R -t public_content_t /var/ftp/pub/
Any directory that is going to be used on read-write FTP operations must be labelled as public_content_rw_t
chcon -R -t public_content_rw_t /var/pub/ftp
Users listed in /etc/vsftpd/user_list are not allowed to log onto the FTP server. Uncomment the following in /etc/vsftpd/vsftpd.conf to enforce restrictions placed in /etc/vsftpd/user_list.
userlist_enable=YES
To allow upload/download in user home directories when selinux is enforced:
setsebool ftp_home_dir 1
Configure FTP to chroot local users into their home directory.
Uncomment the below line in /etc/vstpfd/vsftpd.conf
chroot_local_user=YES
Now normal users will not be able to navigate outside their home directory.
Client's will need to install the ftp client to connect to the server.
yum install ftp
OR
Install lftp using apt-get install lftp
Using LFTP
To start off with connect to the FTP server:
lftp 192.168.18.05
Login to the FTP server via lftp:
lftp 192.168.18.05:~> user yourusername
Password: (Enter your password)
As soon as you are logged in, you can list the remote folders using ls, list all available commands via help.
Let's assume that you have a folder htdocs, that you want to download from your ftp server, just do:
mirror htdocs
This will copy the htdocs folder from the remote ftp server to the local folder you are currently in.
If you want to do the opposite, so copying the local folder htdocs to the remote ftp server, just do:
mirror -R local-dir
Passive Mode
When a user on an FTP session runs a command like ls an active TCP session is envoked. You need to specify the passive port range on your ftp server and open the required ports eg:
In your vsftpd config file:
pasv_enable=YES
pasv_min_port=30000
pasv_max_port=33333
Open the ports in iptables:
iptables -I INPUT 1 -p tcp -m tcp --dport 30000:33333 -j ACCEPT
NFS
Provide network shares to specific clients.
Install NFS.yum install nfs4-acl-tools nfs-utils
Turn NFS services on at boot:
chkconfig nfs on
chkconfig nfslock on
chkconfig rpcbind on
Don’t start NFS service yet, you need to edit configuration first.
The NFS config file is:
/etc/sysconfig/nfs
Advertise NFS v4 only by uncommenting the below in /etc/sysconfig/nfs:
MOUNTD_NFS_V2=“no”
MOUNTD_NFS_V3=“no”
RPCNFSARGS=“-N 2 -N 3”
Edit the resource list, which identifies what shares are available to clients.
vi /etc/exports
Format:
<mount point> <host><permission/options>
Eg:
/home *(ro,sync,root_squash)
* means any client/ip.
Remember, NFS uses standard file permissions/acls etc.
root_squash - prevent users with root permissions from messing with shares.
ro is readonly and will overrule file permissions.
rw is read write, but won’t overrule file permissions.
Once you have added your shares to /etc/exports, start the NFS services:
service nfs start
service nfslock start
After making changes to /etc/exports, rather than restart the nfs service, type the below to avoid any disruption to connected clients:
exportfs -avr
Exported resources are listed in:
/var/lib/nfs/etab
Verify that the NFS daemon is only running NFS v4:
rpcinfo -p
NFS v4 only requires a single firewall rule to allow clients to access shares:
iptables -I INPUT 1 -p tcp -m tcp —dport 2049 -j ACCEPT
For NFS to function properly you need to set the following to off in selinux. However I can’t see nfs_export_all_ro and nfs_export_all_rw in centos 6.
Provide network shares suitable for group collaboration.
On the client install:yum install nfs4-acl-tools nfs-utils
Clients only need to run rpcbind to mount NFS shares:
chkconfig rpcbind on
service rpcbind start
Mount an NFS share:
mount -t nfs 192.168.1.4:/tmp/share /opt/local
List mounted shares:
nfsstat -m
mount | grep nfs
On the NFS server, to view connected NFS clients:
netstat -tuna | grep server_ip:2049
Quick way to add NFS mounts to /etc/fstab for automatic mounting:
cat /etc/mtab | grep nfs >> /etc/fstab
To allow particular IPs to access NFS shares edit /etc/exports:
The below example only allows clients dot 2 and 3 to access /home. * can be used to allow anyone.
/home 192.168.1.2(ro,sync,root_squash) 192.168.1.3(ro,sync,root_squash)
SMB
Provide network shares to specific clients.
Install samba:yum install samba
Make sure the below are installed:
samba-common
samba-winbind
Start the services:
service nmb start
service smb start
service winbind start
Turn the services on by default:
chkconfig nmb on
chkconfig smb on
chkconfig winbind on
On the server open the below ports:
iptables -I INPUT 1 -p udp -m udp --dport 137 -j ACCEPT
iptables -I INPUT 1 -p udp -m udp --dport 138 -j ACCEPT
iptables -I INPUT 1 -p tcp -m tcp --dport 139 -j ACCEPT
iptables -I INPUT 1 -p tcp -m tcp --dport 445 -j ACCEPT
The samba config file is located at:
/etc/samba/smb.conf
When you change the config file make sure you reload it so that the changes take effect:
service smb reload
At the bottom of the smb.conf, shares can be added as required. To allow users to edit their smb home shares you will need to switch the below on in selinux:
setsebool -P samba_enable_home_dirs on
When creating the folders/files for your samba shares set the correct selinux context:
chcon -R -t samba_share_t /opt/beare
To check the syntax of your smb.conf file type:
testparm
Samba users will need a local account on the samba server as well as a samba account. Samba accounts and their passwords can be created using:
smbpasswd -a linux_user
Adding a local account (do this first):
useradd linux_user -s /sbin/nologin
List all samba users on the server:
pdbedit -L
Unlock a samba user account:
pdbedit -c='[]' samba_username
Show connected samba clients:
smbstatus
To block users and groups from accessing a samba share add the following in the relevant share stanza in smb.conf:
invalid users = mike, @group1
To allow only particular users or groups to access the samba share add the following in the relevant share stanza in smb.conf:
valid users = bill, @group2
Blocking network addresses from accessing SMB
This can be done globally in the Network Related Options section of smb.conf eg to block an IP:
hosts deny = 192.168.1.4
OR to allow an IP range, but block a particular address:
hosts allow = 192.168.1 EXCEPT 192.168.1.8
This can also be done for individual samba shares by modifying the relevant stanzas in smb.conf.
Provide network shares suitable for group collaboration.
Install the client to access a samba share:yum install samba-client
Open ports 137 and 138 (udp) on the client:
iptables -I INPUT 1 -p udp -m udp --dport 137 -j ACCEPT
iptables -I INPUT 1 -p udp -m udp --dport 138 -j ACCEPT
View available shares on a server for a particular client eg bill:
smbclient -L example.com -U bill
To mount a share:
mount -t cifs //192.168.1.4/beare_share /opt/some_dir -o username=user1,password=password1
To mount a share automatically at logon, create a hidden file in the users home dir with 600 permissions that includes the below:
username=lucas
password=jf8w763
domain=example.local
Then modify /etc/fstab wth the below:
//192.168.1.2/smb_share /home/lucas/ cifs user,credentials=/home/lucas/.smb,_netdev 0 0
You may also need to give users permission to mount cifs share:
chmod u+s /sbin/mount.cifs
Collaborative folders
To create a publicly accessible folder, but where users cannot modify files that they do not own, set the sticky bit on the folder and allow access to all:
chmod -R 1777 /public
SMTP
Configure a mail transfer agent (MTA) to accept inbound email from other systems.
Open port 25 to receive email:iptables -I INPUT 1 -p tcp -m tcp --dport 25 -j ACCEPT
Start the service:
service postfix start
From a client test that postfix is listening:
telnet 192.168.1.2 25
Type quit and enter to exit telnet.
In /etc/postfix/main.cf set the below:
myhostname = mail.test.com
mydomain = test.com
myorigin = $mydomain
intet_interfaces = all
mydestination = $myhostname, localhost.$mydomain, localhost, $mydomain
mynetworks = 192.168.1.0/24, 127.0.0.0/8
After making changes to main.cf reload the config file. Run postconf -n to review changes to main.cf
Regarding sender authentication, the below line in main.cf will require senders to authenticate:
smtpd_sender_restrictions = permit_sasl_authenticated, reject
Redirecting mail
vim /etc/aliases
To redirect Mike's emails to Sarah:
mike: sarah:
After you make a change to /etc/aliases run newaliases to make them take effect.
If you have both postfix and sendmail installed run the below command to switch between the two as the default MTA program:
alternatives --config mta
Using the mail program:
Creating users just for email use
Blocking emails
/etc/postfix/access
Add user accounts on the client and server using useradd.
On the client machine switch to the new client user and type:
Enter the required passphrase when required.
Public and private keys for the client user now exist in ~/.ssh on the client machine.
On the client machine, copy the new client user's public key to the server, enter the required password for the user account on the server when prompted:
The client user's public key has now been copied to ~/.ssh/authorized_keys on the server in the new server user's home dir.
On the client machine using the new client user account ssh to the server using the new server account and enter the passphrase when prompted:
Deny certain IPs from accessing SSH:
Note, if an IP is in both hosts.deny and hosts.allow, allow will win and they will be able to connect.
User and group level security can be controlled by editing "/etc/ssh/sshd_config" and adding the AllowUsers or AllowGroups entries. You can only use one or the other here (groups or users), not both.
You can even specify users from an IP address or hostname:
You can also block users (or groups):
Changing the default ssh port
Some other useful directives in the sshd config (/etc/ssh/sshd_config):
Edit the NTP config file:
vi /etc/ntpd.conf
To enable communication with NTP peers remove the nopeer and noquery options from the first restrict block. The -6 restrict section is for IPv6, the first is for IPv4. You can also remove notrap if you are required to configure remote logging.
To set the NTP peers replace the server directives with something like:
To allow clients on your network to use your NTP server uncomment:
Open UDP port 123, required for NTP:
You can test a connection to your NTP server by running either of the below from a client. This can also be run on the server itself (use localhost as the hostname).
You can view a list of clients your NTP server has serviced by typing:
Note, NTPD is used for both NTP clients and servers.
Changing the timezone
To check your current timezone:
mail -s "enter subject" recipient@example.com
Ctrl + d - sends the email.
useradd bill -s /sbin/nologin
Or just edit /etc/passwd for existing users and set /sbin/nologin.
Configure an MTA to forward (relay) email through a smart host.
In main.cf enter the host you want to relay email through eg gmail:
relayhost = smtp.gmail.com
SSH
Configure key-based authentication.
Edit the sshd config file on the server and ensure that the below is set:
vi /etc/ssh/sshd_config
PubkeyAuthentication yes
ssh-keygen
ssh-copy-id server_user@server
If you are running ssh on a non-standard port number:
ssh-copy-id "server_user@server -p 2222"
ssh server_user@server
Configure additional options described in documentation.
Host level security for SSH can be controlled via iptables or /etc/hosts.allow and /etc/hosts.deny
Block clients from 192.168.122.120:
iptables -I INPUT 1 -s 192.168.122.120 -p tcp -m tcp --dport 22 -j REJECT
vi /etc/hosts.deny
sshd: 192.168.122.120 192.168.122.1
AllowUsers user1 user2
AllowGroups developers
AllowUsers mike@192.168.1.2 sarah@tayicseua.com
DenyUsers mike@192.168.1.2 sarah@tayicseua.com
Uncomment the port directive and change the value:
#port 22
permitrootlogin no - prevent root from logging in via SSH.
X11Forwarding yes - allow users to open GUI applications over ssh (ssh -X -p 22 user@hostname).
NTP
Synchronize time using other NTP peers.
yum install ntp
service ntpd start
chkconfig ntpd on
peer 0.rhel.pool.ntp.org
peer 1.rhel.pool.ntp.org
restrict 192.168.1.0 mask 255.255.255.0 nomodify notrap
Update the network address and mask appropriately for your internal network. You can also remove notrap if you are required to configure remote logging.
iptables -I INPUT 1 -p udp -m udp --dport 123 -j ACCEPT
ntpq -p ntp_server_hostname
Or
ntpdate -q ntp_server_name
ntpdc -c monlist
Copy the relevant timezone from /usr/share/zoneinfo to /etc/localtime, for example to change the timezone to America/Toronto:
cp /usr/share/zoneinfo/America/Toronto /etc/localtime
cat /etc/sysconfig/clock