Linux Bible
How to allow non-root users to upload files onto Apache
Run the below two commands as root.
- chgrp -R users /var/www/html
- chmod -R 0775 /var/www/html
Run the below command for a particular user who requires access to a particular folder.
- chown -R nick.beare /var/www/html/nick
Next you should change the user's home path to their folder in the Apache directory. This will allow the user to FTP documents directly onto /var/www/html/user instead of /home/user. You can do this by finding the relevant user in the /etc/passwd file and modifying the home path associated with their username.
How to set Windows as the default OS on Fedora Core 17
First, find the Windows menu entry
cat /boot/grub2/grub.cfg | grep Windows
This will show something like "Windows XP (loader)(on /dev/sdal)"
Set this as the default
grub2-set-default "Windows XP (loader)(on /dev/sdal)"
Now update the Grub
grub2-mkconfig -o /boot/grub2/grub.cfg
How to sort top by other variables such as memory utilisation
Type the top command. Now type shift+f. This will present you with a list of variables that you can sort by. Enter the letter that corresponds with the relevant variable that you want to sort top by and then hit any key.
How to create a global command
If you want to make one of your scripts globally accessible rather than just being able to run it locally, move the script to /usr/bin or if it requires root access /usr/sbin. If you only want the command to run locally make sure the top line of your script is #!/bin/bash
How to send mail from the command line
mail -s "subject" someone@hotmail.com
Now enter the body of your email.
Type ". enter" to finish. You should see EOT appear.
Note you will need to install the program called mailx.
How to backup files over the internet
You can use rsync to backup new or updated files between two servers over SSH. This is a secure and efficient way to backup your data.
rsync -avz -e ssh username@ipaddress:/home/source/* /home/destination
How to view bandwidth utilisation - iftop
iftop is similar to the top command except it shows network stats rather than cpu stats.
How to set the default gateway for an interface
route add default gw 192.1.168.1.1 eh0
How to prevent your server from accepting a DHCP address from its default gateway AND entering DNS info
In Fedora go to /etc/sysconfig/network-scripts
vi the relevant interface eg ifcfg-em1.
Add or modify if it already exists BOOTPROTO=static. Since you are not using DHCP You can enter DNS details here eg DNS1=220.233.121.23 (new line) DNS2=220.233.121.23. DNS details can also be entered in /etc/resolv.conf nameserver 220.233.121.23 (new line) namserver 220.233.121.23.
How to display the size of a folder or files
du -h "folder name". This command will display the total size of the folder in Mbs. To list the size of all files in the directory type du -ah. Use -s to consolidate the total size of all child folders and files into a single number.
How to remove a folder or file and ignore that annoying "are you sure you want to delete" prompt.
rm -R (or -r) to remove a folder and the contents contained within that folder.
rm -f removes the prompt that appears when removing a file (be careful with this one!).
How to give your Linux box a Fully Qualified Doman Name
To check the current fully qualified domain name of your box type hostname --fqd. To give your box a fqd name type vi /etc/sysconfig/network and type HOSTNAME=beare.zapto.org.
How to determine what groups a user is a member of
Type groups username. The user's groups will appear next to their name:. Group IDs (GID) are contained in /etc/group. To modify a user's group membership type usermod -G groupa,groupb username. Note that there are no spaces between the groups. The -G stands for secondary groups that the user will have access to. If you want to change the user's primary group (initial login group) typ -g. Note, you need to logout and back in again to gain access to the newly added groups.
You can use the useradd command to add a new user and assign them to a group.
Copying files with scp
scp is a secure remote file copy program. scp -r copies the entire directory (includes all files).
To download files from a remote host type scp -r user@remote_host:/home/source_directory /home/local_directory
To upload files to a remote host type: scp -r /home/folder_to_upload user@remote_host:/home/desired_location
sftp is very similar where you can use the get and put commands, but these will not work for entire directories.
Changing file permissions
Files permissions are tricky. Use chmod number(eg 777 r=4, w=2, x=1) file.
Changing group and user ownership
Type chgrp group file. You will then need to check the group permissions (ls -l) to ensure that access is correct.
To change the user ownership type chown user file. u=owner, g=group, o=other, a=all.
Using the ls command to view hidden files
Type ls -a to view hidden files. You're going to need ls -l to see file permissions, group and user ownership etc. You can also include -h to make the file size more readable.
Allow a user to access the shutdown command
Type visudo. This will allow you to edit the /etc/sudoers file.
Make the following changes to the file:
user localhost=/sbin/halt
Using the sleep command to pause a script
Type sleep x where x is the number of seconds.
How to install an rpm from the command line
Type rpm -ivh firefox.rpm
If your install fails due to dependenices use yum to install the dependencies: yum localinstall firefox.rpm
Type rpm -i to simply install the package and rpm -e to remove it.
To see if the package is already installed type rpm -qa | grep packagename. rpm -qa will give you a list of all installed packages.
How to schedule tasks with crontab
Crontab is a program used to schedule tasks. You can modify the /etc/crontab file to add your own scheduled tasks. You can also place scripts in the .etc/crontab/cron.daily folder (there is also a cron.weekly, cron.monthly folder etc). The /etc/crontab file is straight forward. For example if I want to run a script called monkey using the username nick at 8:30 everyday I would enter:
30 8 * * * nick /usr/bin/monkey
How to retrieve a file that you were editing but lost access to.
It can be very annoying when you are working on a text file and your session crashes and you lose your file. However, the file will be stored in swp space. When you vi the file again a message will appear telling you that the file is in swp space and you can access it. You will need to install vim-enhanced, type yum install vim-enhanced. Now you can recover the lost file by typing vim -r file (full path). The file will now open in vi and you can save over the existing file.
Compressing and uncompressing files using tar
There are two tar compression methods - tar.gz and tar.bz2. Bz2 tends to compress files smaller, but takes longer.
Using bz2 to compress a file: tar -cvjf test.tar.bz2 test_file
The c stands for create, v for verbose so you can watch progress, j indicates bz2 compression, f specifies file.
Using bz2 to decompress a file: tar -xvjf test.tar.bz2.
The x stands for extract.
If you want to compress/extract a tar.gz just replace j with z.
Some useful GUI-like configuration programs
Note you must be root to run these two programs.
ntsysv: allows you to set default services for the current run level.
setup: allows you to configure firewall and network settings.
How to send attachments in an email from the command line
yum install muttThis baby allows you to send multiple attachments and they don't get converted to .bin files.
mutt -s "subject" somebody@gmail.com -a attachment1 attachment2 attachment3
The screen will prompt you to confirm the destination email address, your subject, write the body in vi, and then presents you with a list of files you are sending. Follow the prompts and send your email.
How to copy DVDs
You need to install various libraries to use DVD copying apps such as handbrake and K9Copy. yum or apt-get commands will install them for you.- libdvdcss2
- libdvdnav4
- libdvdread4
Finding specific files with find and removing or listing them with xargs
find /home/nick/Pictures -name *MOV | xargs rmThe above command searches the Pictures dir for any files name anything.MOV. It then passes the output to xargs to delete them. The below command would list info about the files matching the criteria.
find /home/nick/Pictures -name *MOV | xargs ls -lh
If you are dealing with filenames with spaces you will have to perform the following when using the find command (use 'filename*')
find /home/sambaman/ -name 'Dal*'
If you wanted to move files that include Dal in their filename, you would have to use the below command because xargs does not like spaces within the filenames. Be careful when using mv it may be safer to use cp.
find /home/sambaman/ -name 'Dal*' -exec mv {} /home/sambaman/lao_family_photo_2011 \;
You can also use find to search for files on your computer that are above a certain size. The below command lists all files in / that are greater than 1Gb. Use M for megabytes.
find / -size +1G
How to stop, start and turn on by default a service that is not listed in chkconfig
Only native services are shown in chkconfig. To start a service like acpid type:systemctl start acpid.service
To stop the service replace start with stop, or replace start with restart to restart the service.
To turn the service on by default type:
systemctl enable acpid.service
Replace enable with disable to switch the service off by default. To check the status of a service type:
service acpid status
To check if a service is running by default type the below command. In the resulting output 0 means it is running by default, 1 means it isn't:
systemctl is-enabled acpid.service; echo $?
How to turn off a linux system by pressing the power button
Install acpid. Turn on the service by default. Navigate to /etc/acpi/events and create a file called powerbtn. In the file type:event=button/power (PWR.||PBTN)
action=/sbin/poweroff
Now restart the service and test out the button.
Text based web browser
Lynx is a commonly used text based web browser for Linux. It works well on beare.zapto.org !How to publish chess games on your webpage
On beare.zapto.org you can view pgn file chess games by using the following URL convention.http://beare.zapto.org/pgn/ltpgnviewer.html?/pgn_files/2012/Spring/kingside.html&ParsePgn=2
ltpgnviewer is the program that will display the pgn file on the webpage. The pgns will need to be named *.html NOT *.pgn. In the above example the chess game is contained in a file named kingside.html. You need to add &ParsePgn=2 at the end of the pgn file location, however if you are having issues viewing the file (for example on Safari (iphone/ipad)) replace the 2 with a 1.
Using diff to output the difference between two files
To compare the contents of two files and then send the difference between the two files to a text file type: diff file1 file2 > difference.txtHow to setup a Unix fileshare with Windows users - SAMBA
yum install sambaThere are a couple of ways to control samba once it is installed.
status smbd
start smbd
stop smbd
restart smbd
If the above didn't work try:
/etc/init.d/smb start
/etc/init.d/smb stop
/etc/init.d/smb restart
/etc/init.d/smb status
Note that the samba file in /etc/init.d can be named slightly differently to the above depending on which version of Samba you have, so run ls /etc/init.d to check.
You can also try to control samba by typing:
service smb status
service smb stop
service smb start
service smb restart
The config file for samba is /etc/samba/smb.conf
Simply add the below lines to the config file to setup a simple Unix share for Windows users.
[share_name]
path =/home/user1
Browseable = yes
Guest ok = yes
read only = no
Valid users = user1, user2
To add samba users and enter their password type smbpasswd -a user1
These are the credentials Windows users will type when mapping the Unix shared drive.
NOTE: users will first need an account on the Linux server with the same password so you will need to run useradd user1 first.
After modifying the samba config file you need to restart the samba service.
If you are running a firewall such as system-config-securitylevel (install name), run system-config-firewall and ensure that samba and samba client traffic are allowed. If you find that when mapping the drive from Windows you do not get a login prompt, it may be because the firewall on the Unix server is blocking the traffic.
The Samba log lives in /var/log/samba/log.smbd
This is useful for troubleshooting if you have trouble connecting from the Windows PC.
Type the following to clear the log: cat /dev/null > /var/log/samba/log.smbd
If you are still being denied access to the share type and are receiving logs like the below:
smbd/notify_inotify.c:421(inotify_watch) inotify_add_watch returned Permission denied
Type: chcon -R -t samba_share_t '/home/shared_folder'
Then restart the samba service and you should be able to access the drive. To control what access the user has to the share eg write access, access to the share is controlled using the usual chmod process on the server.
When mapping the share from the Windows PC the naming convention is as follows. Note you can map to the server's IP address.
\\192.168.1.200\share_name
share_name refers to the name given in the samba configuration file, not the actual path of the share.
smbd and nmbd port numbers:
137/udp
138/udp
139/tcp
445/tcp
How to switch to being a different user
Type su -l userHow to suspend a user's account
passwd username -l - to lock the accountpasswd username -u - to unlock the account
What to do when your Linux system will not boot
You can download a Linux repair disk from http://www.sysresccd.org that will allow you to boot your Linux system if you are unable to boot from your hard drive. From here you can run fsck to check the integrity of the file system. If you need to mount your linux filesystem so that you can modify its contents you can type lvmdiskscan. Make a note of the /dev/x name of the system you want to mount. Then type lvdisplay | more. This will allow you to view more information on the drive. Then go ahead and mount the drive by typing mount /dev/x /mnt/newdir.How to set up your own DNS service - BIND (named)
http://www.techrepublic.com/article/setting-up-a-dns-server-under-linux-part-1-the-configuration/1052952How to boot Ubuntu in text mode by default
Edit /etc/default/grubChange GRUB_CMDLINE_LINUX_DEFAULT="quiet splash" to:
GRUB_CMDLINE_LINUX_DEFAULT="quiet splash text"
Now update grub: update-grub
Change it back and update the Grub if you want to boot back into the GUI.
How to create a directory whose parent does not exist
mkdir -p /home/parentdir/newdir/newerdirHow to see the contents of a tar file
tar vft archive.tar.gzRunning multiple commands with && and ||
With &&, the second command will only run if the first command finishes successfully, that is if it sends an exit code of 0.ls && uname
But with the semicolon, the second command will start right after the first one finishes, no matter whether it succeeds or not.
ls ; uname
There's also ||, the "or" operator, where the second command will only run if the first one fails in some way (exit code is not 0; the command exited with an error) rm hugedir || uname -a
stat - shows detailed information on a file
Shows info such as last accessed, modified, changed eg stat /home/file.txtVi tricks
Ctrl + f to scroll forward one screen at a time. Useful for moving through large docs.Ctrl + b to scroll backward one screen at a time. Useful for moving through large docs.
To do an ls within vi type :!ls -l /home/nick
Print a list of usernames, their corressponding UID, and their home dir
cut -d: -f1,3,6 /etc/passwdMounting tricks
mount -a - mount drives listed in /etc/fstabcat /etc/mtab - view currently mounted drives (same as mount).
How to open a program from a bash shell and not have it take over the entire command prompt
command & eg firefox & or thunderbird &A simple Ubuntu firewall program - Uncomplicated Firewall (UFW)
ufw enable - enable firewall by default.ufw disable - disable firewall by default.
ufw allow 22 - allow ssh traffic.
ufw deny 22 - block ssh traffic.
ufw delete deny 22 - remove the block ssh rule
ufw status verbose - show the current rule list
The program also has a nice gui version - gufw
How to set the root password on a new system
sudo passwd rootSoftware repository program for OpenSUSE
zypper install firefox = install a programzypper update = update all packages.
How to remove a user from a group
gpasswd -d user groupHow to use recovery mode in ubuntu
Boot from the live CD and mount the hard drive. Then create a root account under the live cd and edit the required file in the newly mounted folder. You can also hold down shift during boot to edit the grub and select recovery mode.How to install flash player using apt-get
apt-get install flashplugin-installerHow to display a record of who has logged onto the system
last displays a record of who has logged onto the system. Includes ip address and date and time logged in.How to watch DVDs on Ubuntu 12.10
The 'libdvdread4' package adds the necessary libraries needed to play DVDs - apt-get install libdvdread4The CSS script included with the libdvdread4 allows the 'Content Scramble System' used on virtually all commercial DVDs to be 'unscrambled' and read - sudo /usr/share/doc/libdvdread4/install-css.sh
How to install SSH server on Ubuntu
apt-get install openssh-serveropenssh-client is the client which is installed by default on Ubuntu.
How to turn services on by default on Ubuntu
Ubuntu does not use chkconfig. Type update-rc.d ssh defaults to turn ssh on by default. Replace ssh with the relevant service. Service names exist in /etc/init.dHow to mount a dvd/rw
mount -t iso9660 -o ro /dev/dvdrw /media/mountpointUbuntu equivalent to Red Hat's ntsysv
To install - sudo apt-get install sysv-rc-confTo run - sysv-rc-conf
How to install xubuntu-desktop
To install - apt-get install xubuntu-desktopTo set as default GUI - /usr/lib/lightdm/lightdm-set-defaults --session xubuntu
To set auto-login for xubuntu follow the below steps.
Edit the file /etc/lightdm/lightdm.conf
To enable autologin, edit the file to look like this (remember to enter a username):
[SeatDefaults]
vi /etc/sysconfig/vncservers
Create VNC passwords for your user. Log in as the user and type command:
Go to the end of the file, comment line with "twm &" and add "startx &" to initiate Gnome or "startkde &" for KDE environment initialization. The final result will be the following:
restart the service with - service vncserver restart
Add the VNC tcp,udp port Number in firewall 5900 and 5901
To connect type something like: 192.168.45.45:5901
To check which zone you are currently running the firewall on: firewall-cmd --get-active-zone<
To allow a service such as SSH: firewall-cmd --add-service=ssh
To list all open ports/services: firewall-cmd --zone=external --list-all
To allow a port: firewall-cmd --zone=external --add-port=2222/tcp
getsebool -a | grep ftp Note, the second command listed above takes a long time to execute.
Create a symbolic link as per below. Enter the desired run level folder eg in this example the script will be executed at run level 3 only, rc3.d (you could use rc5.d for run level 5):
The S50 indicates that the script is to be run at startup.
If you run: ll /etc/rc.d/rc3.d/ | grep samplescript.sh
MAILTO="nick@example.com"
Note you can also type crontab -l to view all current crontab tasks.
But what do you call memory that is both used for something and available for applications?
You would call that "free", but Linux calls it "used".
This "something" is what top and free calls "buffers" and "cached". Since your and Linux's terminology differs, you think you are low on ram when you're not.
Reference: http://www.linuxatemyram.com/
If you don't know how to read the numbers, you'll think the ram is 99% full when it's really just 42%.
Reference: http://www.linuxatemyram.com/
An example hosts.allow configuration file:
This file would allow any computer on the 192.168.1.* network to access the SSH service, as well as any comp on 202.300.*.* and the specfic IP address 220.123.23.42.
The /etc/hosts.deny file is run after the /etc/hosts.allow file. This means that hosts in /etc/hosts.allow will be permitted access, even if they are listed in /etc/hosts.deny
An example hosts.deny configuration file:
This file blocks all hosts from accessing SSH. The only hosts permitted access to SSH would be those listed in /etc/hosts.allow. It also returns the string "No SSH for you!" to blocked users.
Just put sh -x in front of your script eg:
Note the -t is for type and ntfs is only an example. Use fdisk -l to check the disk type. Also, you need to ensure that the mountpoint exists, if not just create it with mkdir
To unmount the drive type:
Sometimes you will try to unmount your drive but will receive the below error:
umount2: Device or resource busy
In this case, use umount -l /media/mounted_drive_location to force the drive to unmount.
/bin/cp -rf filename filename
sleep 5 = pause for 5 seconds, a number on its own defaults to seconds.
sleep 5h = 5 hour pause
sleep 3m - 3 minute pause
ssh -X username@host
nmap -sP 192.168.1.0/24
dd if=/dev/sr0 of=/home/path/Windows_XP.iso
Start by editing your Apache configuration file
Do a search for the '.htaccess' file (ESC /.htacess)
Once you have edited the httpd.conf file you need to reload Apache.
Next you need to create a .htaccess file in the web directory you would like to lock down. For example:
Populate the .htaccess file with the below information:
Now you need to create the .htpasswd file (stored in /var/www as indicated in the .htaccess file). The username and password for the permitted user is stored here.
cd /var/www/
The 'username' specified above is the actual user ID that you will need to use when accessing the secure web directory (in this example /var/www/html/secure_dir/). You will also be asked to create the user's password. The password is hashed and stored in the .htpasswd file.
Now when you visit /var/www/html/secure_dir/ you will need to enter the required username and password to progress.
On the client type the below command to generate a new public key. Note, you will need to press enter at the prompts. Do not enter a passphrase.
If you have logged onto the destination server before, run the following command to remove your public key from the known_host file on the server.
Now you need to copy your new key to the server. You will notice that the authorised_keys file on the server is updated.
You will now be able to ssh to the remote server without entering a password.
Note: SSH doesn't like it if your home or ~/.ssh directories have group write permissions. Your home directory should be writable only by you, ~/.ssh should be 700, and authorized_keys should be 600. Also, you need to make sure that your home path in /etc/passwd contains ~/.ssh
NOTE!
SELinux has been integrated into version 2.6 series of the Linux kernel.
You can confirm if SELinux is installed on your system by typing:
sestatus
Ensure that the current mode is 'enforcing'.
su - desired_user -c "/home/user/script.sh"
In Fedora, the reason you can't send emails from a PHP script is because SELinux is stopping Apache (httpd). You need to run the following commands to fix the problem:
setsebool -P httpd_can_sendmail 1
Restart the httpd service.
You may also need to modify the php.ini file to use sendmail.
vi /usr/share/doc/php-common-5.3.13/php.ini-production
Go to the below section and add in your sendmail path eg /usr/sbin/sendmail -t -i
To mount permanently edit /etc/fstab. Be sure to specify the file system type, in this case NTFS. You also need to make the directory you are mounting to if you have not already done so.
To mount the share temporarily:
Off:
On:
Check selinux status:
To list databases type the following command:
To delete a database:
Show all users:
Delete a user:
Create a user and assign a password:
Reset a user's password:
To login as the mysql root user to manage mysql type:
To add a database called sampleDB:
Install MYSQL server and PHP pre-reqs:
Prevent sestatus from blocking your site:
Creating the MYSQL backend:
Grant the apache group ownership of the opencart site:
After installation, delete the install folder from your opencart web folder. Also, be sure to check the IP address/hostname in the admin.php and admin/admin.php files.
Install the below:
Run the below to see the temp:
You can also try:
/etc/init.d/mysqld start
Run the below commands as root.
Edit the below file:
Sample file contents below:
Use the arrow keys and the space bar to enable services by default. q will quit. How to SSH to a non-standard port from the command line
Use -p to specify a non-standard SSH port.
To view accepted SSH logins:
To view failed SSH logins:
ntpdate -s ntp.ubuntu.com
Run this script as root via a crontab task. Enter your relevant email address to get the results mailed to you.
Install Postfix on your server:
During the installation of Postfix, you will be prompted to choose some settings for Postfix.
Show your timezone:
A GUI-like timezone editor:
Edit the below files:
Open the below file and edit the listening port number, 22 by default.
Use -P to specify the port to connect to on the remote host. Note that this option is written with a capital P, because -p is already reserved.
Makes the below changes to your sshd config file, /etc/ssh/sshd_config
Install DenyHosts
DenyHosts keys off of entries in your system's main auth.log file. If a host is ever added to the block list by mistake /etc/hosts.deny can be edited as required.
Using the @reboot cron keyword will execute the specified command once after the machine is booted.
Unlike Linux clients, Windows clients need to install an additional piece of software called Xming to support X forwarding. Simply install the Xming software on your Windows client and launch it, no settings need to be changed.
On the Windows client, open Putty and expand the SSH tab in the category list on
the left. Choose X11 and check 'Enable X11 Forwarding'. The X display location should be localhost:0
On the Linux SSH server side you need ensure that your /etc/ssh/sshd_config file contains the line:
Note! The server will also need to have xauth installed.
By default Apache2 listens on port 80. If this is not desired, you can edit /etc/apache2/ports.conf as desired. After changing this file you need to restart the apache service.
For example if you want to change your apache webserver port to 78 you need to edit /etc/apache2/ports.conf:
Look for the following line:
Replace with the following line:
Save the edited file
Restart the Apache service:
This is a useful way to provide users with their own dir under /var/www and prevent them from getting outside of this directory.
Add the user:
Set a password for the account:
Create a group that users will need to be added to in order to be chrooted:
Add the new user to this group:
Under /var/www create a folder named restricted. This will become the user's home dir.
Set the below permissions on the restricted folder:
Create the user's website directory, they will be able to modify the contents of this directory, but won't be able to delete the directory:
Grant the user permission over their website directory:
Confirm the user's home directory in /etc/passwd, it should be /var/www/restricted. Confirm that they are in the sftponly group by viewing /etc/group.
Now you need to edit /etc/ssh/sshd_config and comment(#) out the below line. Note, if you do not comment out this line your SSH service will break!
And add the following at the bottom of the /etc/ssh/sshd_config file:
Then restart SSH:
The user should now be able to sftp to their directory only. Note ssh access should also be disabled.
Note, if the user is unable to log in check the /var/log/auth.log for errors. It will clearly identify if the permissions are not set correctly on the chrooted folder.
Virtual hosting allows you to set virtual root directories for websites. This allows you to serve up websites using singular unique domain names rather than as children of a common root directory eg mydomain.com/childsite.
CD to the /etc/apache2 dir. Virtual host config files are stored in the sites-available directory. You can make a copy of the default config file and make the below changes to create a new virtual host:
ServerAdmin webmaster@canberracomputers.biz
<Directory /var/www/canberracomputers/>
Once your virtual host config file is complete you will need to create a link to it from sites-enabled. CD to sites-enabled. Note new links in this file MUST be named in ascending order eg 000, 001, 002 etc. Failure to do so may result in virtual hosts being applied to the incorrect root directory.
Type the below command to create a link in sites-enabled to your newly created virtual host config file in sites-available.
Restart the apache service to enable the changes you have made - service apache2 restart. The server name and alias will now redirect to the document root.
On CentOS 6 you need to edit /etc/httpd/conf/httpd.conf. The below example configures 3 virtual hosts.
NameVirtualHost *:80
<VirtualHost *:80>
<VirtualHost *:80>
<VirtualHost *:80>
The bind configuration directory = /etc/bind
#Forward lookup zone
# The reverse lookup zone
You now need to create the associated records in /etc/bind eg etc/bind/db.mydomain.com
$TTL 3600
When editing this file you need to edit the SOA serial number. The serial number is written in a particular format YYYYMMDDXX where XX indicates an increment eg 01. When you edit this file you need to update your serial before you save your file. This will let your secondary name servers know that you have made a change to the zone.
After editing the zone file you will need to restart bind for the configuration change to take effect - service bind9 restart
More info about the SOA
TTL - informs other DNS servers how long they should keep the domain's DNS records in their cache. The default value is 3,600.
Refresh Time - The time, in seconds, a secondary DNS server waits before querying the primary DNS server's SOA record to check for changes. When the refresh time expires, the secondary DNS server requests a copy of the current SOA record from the primary. The primary DNS server complies with this request. The secondary DNS server compares the serial number of the primary DNS server's current SOA record and the serial number in it's own SOA record. If they are different, the secondary DNS server will request a zone transfer from the primary DNS server. The default value is 3,600.
Retry time - The time, in seconds, a secondary server waits before retrying a failed zone transfer. Normally, the retry time is less than the refresh time. The default value is 600.
Expire time - The time, in seconds, that a secondary server will keep trying to complete a zone transfer. If this time expires prior to a successful zone transfer, the secondary server will expire its zone file. This means the secondary will stop answering queries, as it considers its data too old to be reliable. The default value is 86,400.
Negative Cache TTL - (typically occurring when a requested record does not exist) can be also cached on non-authoritative servers. This field resembles a basic TTL, but especially sets the value for negative TTL responses. Small time periods are recommended (15min to 2h).
Port 53 should be opened on your DNS server's firewall. DNS runs on UDP, but zone transfers are performed over TCP so make sure both protocols are allowed.
Below is a sample reverse lookup zone file (/etc/bind/db.192) as referred to in our /etc/bind/named.conf.local file above. This file includes PTR records that map IP addresses to hostnames.
$TTL 604800
Glue Records
A glue record is the IP address of a name server held at the
Domain Name registry.
Glue records are required when you wish to set the name servers of a domain name to a hostname under the domain name itself.
For example if you wished to set the name servers of example.com to ns1.example.com and ns2.example.com you would need to also provide the glue records (i.e. the IP addresses) for ns1.example.com and ns2.example.com.
If you did not provide the glue records for these name servers then your domain name would not work as anyone requiring DNS information for it would get stuck in a loop:
What is the name server for example.com? - ns1.example.com
...and so on.
With the glue record in place the registry will hold the IP address and the loop will not occur:
What is the name server for example.com? - ns1.example.com
DNS forwarding
You can configure forwarding on your DNS server so that it forwards DNS queries it receives for external DNS names to a DNS server outside of your network that you provide.
To set DNS forwarding on your server edit /etc/bind/named.conf.options
forwarders {
To disable recursive queries for external users, but still allow them for internal users, add the following line to /etc/bind/named.conf.options. You can also allow recursive queries only for localhost.
Append the below to disable recursive queries for all:
Using nslookup in Windows to test your DNS server
You can set your nslookup session to use your DNS server for all queries:
You can search on particular DNS records:
For SOA:
For name server records:
An authoritative response from a server appears blank whilst non-authoritative responses are marked.
Show live DNS lookup requests on your server
Run the below command to start logging DNS querys in syslog:
Run the below command to view the bottom of syslog:
iRedMail installs various mail related products including Postfox, Dovecot, Spam Assassin and RoundCube. It works with minimal config right out of the box.
To install iRedMail, you need a FRESH working Ubuntu Linux installation and at least 1GB of memory for production use.
To begin with configure your network settings and update your OS via apt-get.
Set a fully qualified domain name (FQDN) hostname on your server. Enter command 'hostname -f' to view the current hostname:
On Ubuntu, hostname is set in two files:
/etc/hosts: hostname <=> IP address mapping. Warning: List the FQDN hostname as first item.
Verify the FQDN hostname. If it wasn't changed, please reboot server to make it work.
Download the latest release of iRedMail using wget:
Uncompress iRedMail tarball:
It's now time to start the iRedMail installer, it will ask you some simple questions, that's all steps to setup a full-featured mail server.
A GUI installation menu will appear, I went mainly for the defaults and chose to install MySQL. Note that the postmaster account is used to log into iredadmin where you can create and manage virtual users and domains. Note that you should not create a local user and a virtual mail user with the same username (the virtual user will experience issues such as not being able to log into RoundCube). Type no to the firewall rules during the installation.
After the installation read the file /root/iRedMail-x.y.z/iRedMail.tips first, it contains URLs and usernames and passwords of web-based applications such as MySQL.
You can open the below ports on your UFW (firewall) to allow iRedMail to function:
When logging into RoundCube your username must be entered as username@domain (or virtual domain). You also need to use this format when logging into the iRedAdmin tool.
When trying to configure mail clients to connect to your iRedMail box you may experience some issues if you are using a self signed certificate. I have found the default mail applications on IOS and Android to be fine, as well as Thunderbird, Sylpheed and IA Mail.
Mail error log - /var/log/mail.err
I have a setup where I receive mail from an unqualified FQDN on a separate network. Postfix was blocking these emails. To allow the mail I had to edit the postfix config file /etc/postfix/main.cf and specify the trusted network by hand eg:
Discarding spam emails
Edit the Amavisd config file, find the below settings and update them. If they don't exist, just add them. Note the D_DISCARD value (which drops the email rather than relaying it to your mailbox), by default it was set to D_PASS.
vi /etc/amavisd/amavisd.conf
# Set default action.
Then restart the amavisd service with service amavisd restart although I found that I had to actually restart the server for the change to take effect.
Radicale is a simple calendar (CalDAV) and contact (CardDAV) server. You can install it by simply typing:
At the end of the installation you will be asked to review a particular radicale config file (the path is mentioned). Make sure you edit this file and set radicale to launch at startup. You will also need to open port 5232 on your firewall. You can confirm Radicale is working by going to http://server_name:5232
You can check to see if the radicale service is running by typing:
To create the calendar (.ics) and contact files (.vcf, this file can include pictures for contacts) for a user you need to use a CalDAV or CardDAV client on your mobile device or desktop (IA Client). The user does not need to exist on the server. Just enter the below in your client to create the appropriate file:
These files are downloadable from a web browser and exist in the below dir:
Securing your radicale calendar (.ics) and contact list (.vcf)
Edit the radicale config file:
Go to the [acl] section and set the below changes only. Note, you can specify multiple users under private_users by separating them with a comma.
After editing /etc/radicale/config you must restart the service - service radicale restart
Next create the username and encrypted password:
htpasswd switches:
If you now check /etc/radicale/users you will see username:encrypted_password
Now if you browse to http://server_name:5232/username you will receive a username/password prompt. This will protect your calendar and contact list from prying eyes!
Typing capital G in vi's control mode will send you straight to the bottom of the file. You can return to the top of the file by hitting lowercase g twice.
To replace characters in vi type the below commands:
To find each occurrence of 'foo' (in all lines), and replace it with 'bar':
To change each 'foo' to 'bar', but ask for confirmation first:
To change only whole words exactly matching 'foo' to 'bar':
Case and searching in vi
Make your searches in vi case-insensitive:
Make your searches in vi case-sensitive (the default):
Open the file using vi. Go to command mode. Hold shift and g. You should now go to the end of the file.
do-release-upgrade
last
Show only reboots:
Only the super user can set this. This prevents anyone, including root, from deleting the file.
Set the immutable bit:
Check that the immutable bit is set, you will see an i and root will not be able to delete the file:
To turn off the immutable bit:
Shows info such as inode, size, access and modification dates etc.
stat filename
Set a service to turn on at startup:
Set a service to remain off at startup:
Firewall
List all services currently permitted through the firewall:
Temporarily allow a service:
Temporarily remove a service from the allowed list:
Permanently allow a service:
Permanently remove a service from the allowed list:
List all ports/protocols currently permitted through the firewall:
Ports
Temporarily remove a port/protocol from the allowed list:
Permanently open a port/protocol eg 443/tcp:
Permanently remove a port/protocol from the allowed list:
Type the history command to view previous commands and their associated line numbers. You can run these commands by typing !12 where twelve represents the line number of the command.
Step 2: Create the repository directory
Step 3: Move your RPM files into the packages directory
Step 4: Run createrepo:
The createrepo command reads through the directory created in step 2 and creates a new directory called repodata in it. The repodata directory holds the metadata information for the newly created repository. Every time we add additional RPM package files to our Custom YUM Repository (packages folder), we need to re-create the repository metadata with the "createrepo" command.
Step 5: Create the YUM Repository Configuration file
First install squid3:
Open port 3128 for squid on your server's firewall:
Now that squid3 is working install dansguardian. DansGuardian is a filtering pass-
through that sits between the client browser and the squid proxy. It listens on port 8080
and connects to squid on port 3128.
Open port 8080 for dansguardian on your server's firewall:
Whitelistinfg a URL
Edit your postfix config:
Add the following code at the end of your config:
Replace mail.iinet.net.au with the actual smtp server of your ISP. Also SASL must be working. You can put the port in if required eg mail.iinet.net.au:587
After having extended the postfix config you'll still need to add your ISP email credentials to the /etc/postfix/saslpasswd file, so that you can authorize yourself at your ISP.
Before postfix can use that file, it needs to be hashed by postmap:
Finally you need to restart postfix to use the new config:
When you now send an email using your email server to yourself (for example to a gmail account) and if you then check the full headers of that email, you will see, that the email was relayed through your ISP. That means it works now. As long as your ISP now isn't blacklisted, your dynamic IP won't hinder you to send email.
Note, remember to update your SPF rule accordingly.
Greylisting is effective because many mass email tools used by spammers do not queue and reattempt mail delivery as is normal for a regular Mail Transport Agent.
On a technical level, some misbehaving SMTP senders may interpret the temporary rejection as a permanent failure. Old clients conforming only to the obsolete specification (RFC 821) and ignoring its recommendations may give up on delivery after the first failed attempt.
To disable Greylisting on CentOS edit /etc/postfix-policyd.conf as per the below:
Then restart the service with /etc/init.d/policyd restart
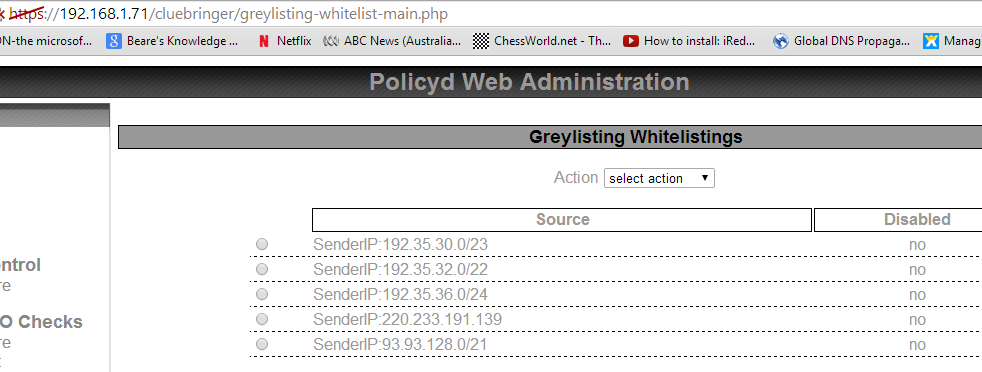
You can whitelist these IPs by logging into your Policyd Web Administration page with your Postfix Postmaster admin credentials (https://domain.name/cluebringer). In the left bar choose Greylisting Whitelist and add every IP you trust. Note that every single entry must have the value "disabled" "no" otherwise the whitelist won't work. You can use CIDR notation here. To find the CIDR for the blocked IP you found in /var/log/mail.log, you can do a search on the IP at tcpiputils.com.
To make your changes take effect you must restart the postfix-cluebringer service:
If your proxy requires authentication, add the following lines to your wgetrc file:
Configure RHN to work through a proxy server:
# Create a folder and name it with the captured variable
# Change to the newly created directory
# Download an entire website eg nickbeare.com When you find a satisfactory server, run the ntpdate command followed by one or more server addresses: However, the more convenient way is to set the ntpd daemon to synchronize the time at boot time automatically: Now add or edit the list of public NTP servers eg:
server 0.rhel.pool.ntp.org iburst
The iburst directive at the end of each line is to speed up the initial synchronization.
Remember to set the ntpd service to start automatically (chkconfig) and to start the service.
ntpdate is a command that will use /etc/ntp.conf to do an immediate update now as opposed to waiting for ntpd to do it. You can use ntpdate to do manual updates eg ntpdate pool.ntp.org.
First, create the ifcfg-bond0 configuration file. USERCTL directs that only root, or
all system users can control the device.
Next, edit/create the ifcfg-eth(0,1) files. These are created as slave interfaces
(SLAVE=yes) with bond0 as the master interface (MASTER=bond0):
/etc/modprobe.conf is deprecated in CentOS 6.x so an appropriate file should be
created under /etc/modprobe.d – in our case, bonding.conf:
If your switch is configured to use LACP set your mode to 4 and lacp rate to 1.
To test, manually load the module and restart the networking service:
Verify that all is well with ifconfig -a, or more suitably a cat on
/proc/net/bonding/bond0. You can test that the bond works by taking down one of the
ethernet interfaces.
Update apt-get and install Skype:
Add the following:
Edit your configuration file:
Restart the snmpd service and set it to turn on by default when you restart your machine:
Open port 161 UDP on your firewall so that the polling service can reach your SNMP client:
Use the netstat command to verify that snmpd is listening on all addresses:
Test your snmp client locally:
Set the web-based nagios admin username and password. Keep the username as "nagiosadmin":
Go to the nagios web panel at http://IP/nagios and login using the nagiosadmin user credential and the above set password.
Currently no external hosts are being monitored. We can configure nagios to ping any open ports such as a webserver, e-mail server, and DNS server etc.
Run the below command to copy the server configuration path to the nagios configuration file:
To add your first host cd to /etc/nagios/servers and create one configuration file per host eg:
Edit the host's configuration file. Below is a sample host file I created. I have defined a non-standard port for SSH and defined the particular tcp ports that I am interested in polling:
define host {
define service {
define service{
define service{
define service {
define service {
define service{
define service{
After you are done adding all the host configurations, you should set folder permissions correctly and restart Nagios on the monitoring server:
By default nagios will send email alerts when a host's service is unreachable via ping. You can set the nominated address that you want to send these notifications to in:
lftp -u remote_user,remote_password -e 'mirror --verbose /home/ftp_server/share /home/ftp_client/share' remote_server
The above code should be contained in a file and invoked by bash on the lftp client's machine. This will mirror ALL files in /home/ftp_server/share to /home/ftp_client/share. This ensures that only new or modified files are copied across each time. Note, the last part of the command 'remote_server' can be the hostname or IP address of the ftp server. Also, when running the command on the cmd line (not calling it from a script) you will need to omit the password and type it manually.
To PUSH files from our client to the FTP server we use:
Ubuntu - apt-get install unattended-upgrades
The client will need to know about the domain details so perhaps edit /etc/resolv.conf to use the DC as the primary DNS server or add entries to /etc/hosts for the domain name and your DC.
authconfig-tui
Click the Join Domain button and enter the credentials of an authorised AD user. You may need to restart the winbind service after this step.
Now that the computer is joined to the domain you can query AD:
Edit smb.conf so you can refer to AD users without the domain.
To allow cached credentials:
Automatically make home directories for authenticated AD users when they log in:
Allow domain admins to become root.
If you have used the allowusers flag in your sshd config file, remember to add your AD users.
To configure transmission to automatically download torrent files as soon as they are dropped in a certain directory, modify the settings.json file to include the below lines:
To make the new config take effect, restart the transmission service:
Add a torrent to download and seed.
Show torrent's associated files where 1 corresponds with the torrent id listed in the -l output.
Remove a torrent where 1 corresponds with the torrent id listed in the -l output.
Remove a torrent and delete its associated data files where 1 corresponds with the torrent id listed in the -l output.
Show detailed information about a torrent where 1 corresponds with the torrent id listed in the -l output.
Show a torrent's connected peers, where 1 corresponds with the torrent id listed in the -l output.
Show transmission server configuration.
Show transmission server upload/download stats.
Require encrypted peer connections.
Run the below to clear your current history and your bash_history file.
last - searches /var/log/wtmp and displays a list of all users logged in (and out) since that file was created.
cat /var/log/secure - this file contains the logs of all the attempts made for login to your machine with authentication
reports.
finger - show each user currently logged into the system.
who - shows currently logged in users with time details
whoami - show the user name associated with the current effective user ID.
To make the alias permanent you will need to add the above line to your ~/.bashrc file. Run . ~/bashrc to envoke this, or logoff and back on again.
You can pipe your search results into xargs rm to remove the files, you will need to use the below deliminter if you have spaces in the filenames.
You can use grub-crypt utility to create an encrypted password.
grub-crypt will get the clear text password from the user, and display the encrypted password as shown below.
# grub-crypt
Modify the grub.conf file, add the “password” entry with the –encrypted argument as shown below. Just copy the output of the grub-crypt command, and paste it after the “–encrypted” argument in the password entry.
$ vi /etc/grub.conf
autologin-user=
autologin-user-timeout=0
user-session=xubuntu
greeter-session=lightdm-gtk-greeter
How to setup VNC Server
yum install tigervnc-server
VNCSERVERS="1:beare"
VNCSERVERARGS[1]="-geometry 800x600"
vncpasswd
cd ~/.vnc
vi xstartup
Comment "vncconfig -iconic &" line with "#" symbol, so the result will looks like this:
#vncconfig -iconic &
for Gnome
#twm &
startx &
Configuring Firewalld for Fedora 18
To launch the graphical firewall type: firewall-config
List all available zones: firewall-cmd --get-zones
To change a zone for an interface: firewall-cmd --zone=external --change-interface=wlan0
To block a service: firewall-cmd --remove-service=ssh
Block a port: firewall-cmd --zone=external --remove-port=2222/tcp
Enabling FTP for VSFTPD
Once setting up VSFTPD under Fedora 15, users will not be able to FTP to the server. They will receive an error like "500 OOPS: cannot change directory:/home/user".
You need to make sure that the ftp_home_dir is set to on.
You can do this by following the below steps.
setsebool -P ftp_home_dir on
getsebool -a | grep ftp
How to execute a script at startup
Place your script in /etc/init.d/ and make sure it is executable.
ln -s /etc/init.d/samplescript.sh /etc/rc.d/rc3.d/S50samplescript.sh
You should see something like the below, picturing the newly created symbolic link.
lrwxrwxrwx. 1 root root 25 Jun 10 17:39 S50samplescript.sh -> /etc/init.d/samplescript.sh
More on Crontab - How to create crontab jobs
Become a super user and then type crontab -e
Enter your job details here. Below is a sample cron job which runs a script (/home/script.sh) at 6:30am, 11:30am, 4:30pm, and 9:30pm every day of the week and emails the result. Refer to the LPIC guides at nickbeare.com for more info on cron jobs
30 6,11,16,21 * * 1-7 /home/script.sh
Configure your Dell PC to automatically turn on after a power outage
Enter the bios setup by hitting F2 at startup.
Select Power Management.
Select AC Recovery.
Ensure that the 'Power On' radio button is ticked.
Why does top and free say all my ram is used if it isn't?
This is just a misunderstanding of terms. Both you and Linux agree that memory taken by applications is "used", while memory that isn't used for anything is "free".
Memory that is You'd call it Linux calls it
taken by applications
Used
Used
available for applications, and used for something
Free
Used
not used for anything
Free
Free
How do I see how much free ram I really have?
Too see how much ram is free to use for your applications, run free -m and look at the row that says "-/+ buffers/cache" in the column that says "free". That is your answer in megabytes:
$ free -m

             total       used       free     shared    buffers     cached

Mem:          1504       1491         13          0         91        764

-/+ buffers/cache:        635        869

Swap:         2047          6       2041

$
Securing SSHD with TCP Wrappers
Edit the /etc/hosts.allow file. Here you can specify which IP addresses you want to be able to use the SSH service.
sshd : 192.168.1. , 202.300. , 220,123.23.42
sshd : ALL : twist echo "No SSH for you!"
How to run your script in a verbose/debug mode
This will dump out all the commands you execute, variable values etc. It's useful to work out what's going on.
sh -x script_name
Mounting and unmounting a hard drive
Use fdisk -l to find the drive name eg /dev/sdb1. To mount the drive so it can be used, type:
mount -t ntfs /dev/sdb1 /media/mountpoint
umount /media/mounted_drive_location
umount: /media/exchange: device is busy.
(In some cases useful info about processes that use
the device is found by lsof(8) or fuser(1))
What to do when cp -rf doesn't force a copy
The "f" option doesn't always work. The reason it doesn't always work is because it is aliased. In order to run a command that is aliased you will need to run it as follows:
The sleep command
The sleep command creates pauses, which is useful during some scripts while you wait for something to process.
How to load the USB Startup Disk Creator from the command line
usb-creator-gtk
Launching GUI apps on a remote server using ssh
You can launch GUI applications such as thunar (file browser) on a remote server using ssh. The applications are interactive on the client, but the procesing is done on the server. You can make changes to the server via this method.
Ping an entire IP address range to find hosts
You can use nmap to ping an entire address range to find hosts. This is a great way to see what active hosts are on your network.
Convert a DVD to an ISO file from the command line
A simple and effective way to backup dvds to an iso file. Replace /dev/sr0 with your own device.
How to password protect a webpage
With Apache you can password protect an entire web directory. Only visitors who know the username and password will be able to view the website.
vi /etc/httpd/conf/httpd.conf
Once you find .htaccess you will see a line directly below named:
AllowOverride None
Change this to:
AllowOverride All.
service httpd reload
vi /var/www/html/secure_dir/.htaccess
AuthUserFile /var/www/.htpasswd
AuthName "Stop, authorised users only!"
AuthType Basic
require valid-user
htpasswd -c .htpasswd username
How to enable password-less SSH connections
By enabling this option you can automate tasks such as scp and rsync using cron.
ssh-keygen
ssh-keygen -f "/home/username/.ssh/known_hosts" -R username@server_ip
ssh-copy-id -i /home/username/.ssh/id_rsa.pub username@server_ip
You actually really should create a passphrase to protect your client's private key!!! You can still perform passwordless automated connections with a key that has a passphrase by typing the following on the client after you run ssh-keygen:
eval 'ssh-agent'
ssh-add ~/.ssh/id_rsa
ssh-add -l
Security-Enhanced Linux (SELinux)
How to execute a script as a different user
su specifies the user to run the script as.
-c specifies the path of the script.
Allow PHP to send an email from Fedora
/etc/init.d/httpd restart
; For Unix only. You may supply arguments as well (default: "sendmail -t -i").
; http://php.net/sendmail-path
sendmail_path = /usr/sbin/sendmail -t -i
Mount a Windows share on Linux
//windows_server/share /mnt/local_mount_point ntfs username=windows_username,password=windows_password 0 0
mount -t ntfs //windows_server/share -o username=windows_username,password=windows_password /mnt/local_mount_point
How to turn selinux on and off
echo 0 >/selinux/enforce
echo 1 >/selinux/enforce
sestatus
MYSQL commands
show databases;
drop database foo;
select user from mysql.user;
drop user insert_username;
create user 'jeffrey'@'localhost' identified by 'insert_password';
set password for 'insert_username'@'insert_hostname' = password('insert_new_password');
mysql -u root -p
create database sampleDB;
Opencart installation/configuration tips
yum install mysql-server mysql
yum install php-mysql
yum install php-mcrypt
yum install php-gd
chcon -R -thttpd_sys_content_rw_t /var/www/html/store
create database insert_opencart_db_name;
GRANT ALL PRIVILEGES ON insert_opencart_db_name . * TO insert_username@'localhost' IDENTIFIED BY 'insert_password' WITH GRANT OPTION;
flush privileges;
chgrp apache -R opencart/
Show CPU Temperature
apt-get install acpi
acpi -t
cat /sys/class/thermal/thermal_zone0/temp
How to start the MYSQL service
How to extract an ISO using the Linux command line
mkdir /mnt/iso
mount -o loop /home/user/My_Disc.iso /mnt/iso
cp -r /mnt/iso /home/user/My_Disc_Extracted
Configuring a network interface in Ubuntu
/etc/network/interfaces
auto eth0
iface eth0 inet static
address 192.168.1.2
netmask 255.255.255.0
network 192.168.1.0
broadcast 192.168.1.255
gateway 192.168.1.1
dns-nameservers 8.8.8.8 9.9.9.9
ntsysv equivalent for Ubuntu
apt-get install sysv-rc-conf
ssh username@192.168.1.1 -p 2890
Monitoring SSH logins in Ubuntu
grep sshd.\*Accepted /var/log/auth.log
grep sshd.\*Failed /var/log/auth.log
Update the time in Ubuntu
SSH Failed/Accepted Login & Last Login monitor
cat /dev/null > /home/user/logger
echo "***Root's Last Login***" > /home/user/logger
lastlog | grep root >> /home/user/logger
echo >> /home/user/logger
echo "***user's Last Login***" >> /home/user/logger
lastlog | grep user >> /home/user/logger
echo >> /home/user/logger
echo "***Failed SSH Logins***" >> /home/user/logger
grep sshd.\*Failed /var/log/auth.log >> /home/user/logger
echo >> /home/user/logger
echo "***Accepted SSH Logins***" >> /home/user/logger
grep sshd.\*Accepted /var/log/auth.log >> /home/user/logger
cat /home/user/logger | mutt -s "Accepted/Failed SSH Logins & Last Logins" user@beare.com
cat /dev/null > /var/log/auth.log
How to install postfix on Ubuntu and configure it to only send email (not receive)
sudo apt-get install postfix
For 'type of mail configuration' select 'Satellite system'.
For 'mail name' type the default domain name to use in outgoing emails eg hostname.
For 'relay host', set as blank (delete any existing content).
Changing the NTP timezone
cat /etc/timezone
sudo dpkg-reconfigure tzdata
Change the hostname in Ubuntu
/etc/hostname
/etc/hosts
Change the default listening port for OpenSSHD
/etc/ssh/sshd_config
How to SCP across a non-standard port (ie not 22)
scp -P 30000 example_file.html username@ipaddress:/home/user
Securing SSHD
PermitRootLogin no
AllowUsers = userid userid2 userid3
Port non_standard port
apt-get install denyhosts
All of DenyHosts's configuration is kept in /etc/denyhosts.conf Recommended tweaks to existing config:
PURGE_DENY = 30d
PURGE_THRESHOLD = 2
DENY_THRESHOLD_INVALID = 1
DENY_THRESHOLD_VALID = 3
DENY_THRESHOLD_ROOT = 1
SYSLOG_REPORTING = YES
AGE_RESET_VALID = 1h
RESET_ON_SUCCESS = yes
SYNC_UPLOAD = yes
SYNC_DOWNLOAD = YES
How to Execute a Linux Command After Every Reboot using @reboot
@reboot /home/user/some_script.sh
X forwarding with Putty on Windows clients
X11Forwarding Yes
If you change this file, you will need to restart the SSH service.
How to change the default listening port in Apache
sudo vi /etc/apache2/ports.conf
Listen 80
Listen 78
sudo /etc/init.d/apache2 restart
How to chroot a user using OpenSSH
useradd -d /var/www/restricted/ username
passwd username
groupadd -g 20000 sftponly
usermod -aG sftponly username
mkdir /var/www/restricted
chown root:username /var/www/restricted
chmod 755 /var/www/restricted
mkdir /var/www/restricted/website
chown username:username /var/www/restricted/website
chmod 755 /var/www/restricted/website
Subsystem sftp /usr/lib/openssh/sftp-server
Subsystem sftp internal-sftp
Match group sftponly
ChrootDirectory %h
ForceCommand internal-sftp
X11Forwarding no
AllowTCPForwarding no
service ssh restart
Virtual Hosts in Apache
servername canberracomputers.biz
serveralias www.canberracomputers.biz
DocumentRoot /var/www/canberracomputers
Options Indexes FollowSymLinks Multiviews
Allowoverride None
order allow,deny
allow from all
</directory>
ls -s ../sites-available/new_website.conf 001-new_website.conf
ServerAdmin postmaster@tayicseua.com
DocumentRoot /var/www/html/tayicseua
ServerName www.tayicseua.com
ErrorLog /var/www/html/tad/error.log
CustomLog logs/dummy-host.tayicseua.com-access_log common
</VirtualHost>
ServerAdmin postmaster@nickbeare.com
DocumentRoot /var/www/html
ServerName nickbeare.com
ErrorLog /var/www/html/error.log
CustomLog logs/dummy-host.nickbeare.com-access_log common
</VirtualHost>
ServerAdmin postmaster@nickbeare.com
DocumentRoot /var/www/html
ServerName www.nickbeare.com
ErrorLog /var/www/html/error.log
CustomLog logs/dummy-host.nickbeare.com-access_log common
</VirtualHost>
Hosting your own public DNS server using bind
The named.conf.local file contains the DNS zones that your DNS server holds records for. You will need to create the corresponding files that you mention in the below file. The below sample named.conf.local file contains one forward lookup zone and one reverse lookup zone (multiple zones can be recorded in the same file). The forward lookup zone in this example is configured to do a zone transfer with a seconday DNS server (note the IP addrress).
zone "mydomain.com" {
type master;
notify yes;
file "/etc/bind/db.mydomain.com";
allow-transfer {
202.157.182.142;
};
};
zone "1.168.192.in-addr.arpa" {
type master;
notify no;
file "/etc/bind/db.192";
};
You should be able to copy an existing record such as db.local so you can use it as a template. Your new forward lookup zone file will hold all the DNS records for the required domain including A, MS, SPF and NS records. It also includes the SOA. A sample file is listed below. Note the use of the full stops at the end of the addresses and that a fullstop is used in place of the @ simple for the email address. Also at the start of the records the @ symbol represents the domain name eg mydomain.com
@ IN SOA ns1.mydomain.com. postmaster.mydomain.com. (
2014032703 ; Serial
12H ; Refresh
1H ; Retry
2W ; Expire
3H ) ; Negative Cache TTL
;
@ IN NS ns1.mydomain.com.
ns1 IN A 180.200.129.143
@ IN NS ns1.twisted4life.com.
@ IN MX 10 mydomain.com.
@ IN A 180.200.129.143
www IN A 180.200.129.143
@ IN TXT "v=spf1 a -all"
@ IN MX 20 mxbackup1.junkemailfilter.com.
@ IN MX 30 mxbackup2.junkemailfilter.com.
If you made a mistake in your config file bind will not start.
The SOA resource record indicates that this DNS name server is the best source of information for the data within this DNS domain.
@ IN SOA ns1.laolimestone.biz. postmaster.laolimestone.biz. (
2014032301 ; Serial
604800 ; Refresh
86400 ; Retry
2419200 ; Expire
604800 ) ; Negative Cache TTL
;
@ IN NS ns.
38 IN PTR ns.laolimestone.biz.
43 IN PTR web.laolimestone.biz.
44 IN PTR ftp.laolimestone.biz.
What is the IP address of ns1.example.com? - don't know, try looking at name server for example.com
What is the name server for example.com? - ns1.example.com
What is the IP address of ns1.example.com? - [IP Address]
In the below example google's DNS servers are marked as our forwarders.
8.8.8.8; 8.8.4.4;
};
allow-recursion { localnets; };
recursion no;
server ns1.nickbeare.com
For mail exchange records:
set q=mx
set q=soa
set q=ns
rndc querylog
tail -f /var/log/syslog
iRedMail setup guide
$ hostname -f
mx.example.com
/etc/hostname: hostname setting
# File: /etc/hostname
demo
# Part of file: /etc/hosts
127.0.0.1 mx.example.com demo localhost localhost.localdomain
$ hostname -f
mx.example.com
wget https://bitbucket.org/zhb/iredmail/downloads/iRedMail-0.8.6.tar.bz2
# cd /root/
# tar xjf iRedMail-x.y.z.tar.bz2
# cd /root/iRedMail-x.y.z/
# bash iRedMail.sh
Webmail - https://your_server/mail/
iRedAdmin (admin panel) - https://your_server/iredadmin/
phpMyAdmin - https://your_server/phpmyadmin/
443 and 80 for RoundCube and the iRedAdmin tool
25 SMTP Non-Encrypted (AUTH)
587 SMTPS Secure (TLS)
465 SMTPS Secure (SSL)
143 IMAP Non-Encrypted (AUTH)
143 IMAPS Secure (TLS)
993 IMAPS Secure (SSL)
110 POP3 Non-Encrypted (AUTH)
995 POP3S Secure (SSL)
Incoming mail log - /var/log/mail.log
mynetworks = 168.100.189.72
I added the below configuration change to prevent spam emails from reaching my mailbox. By default these emails were being detected and marked as spam, but were still being relayed to my email address with a detected spam heading. After the below change was made the emails did not reach my mailbox, but could be viewed in the postmaster's mailbox as detected spam.
# Available actions: D_PASS, D_BOUNCE, D_REJECT, D_DISCARD.
$final_virus_destiny = D_DISCARD;
$final_banned_destiny = D_DISCARD;
$final_spam_destiny = D_DISCARD;
$final_bad_header_destiny = D_DISCARD;
Radicale setup guide
apt-get install radicale
service radicale status
http://server_name:5232/username/Calendar.ics
http://server_name:5232/username/AddressBook.vcf
/var/lib/radicale/collections/username
vi /etc/radicale/config
type = htpasswd
private_users = username, username2
htpasswd_filename = /etc/radicale/users
htpasswd_encryption = crypt (or sha1 if you prefer)
htpasswd -cd /etc/radicale/users username
Enter the password accordingly when prompted.
-c creates the htpasswd file, if you want to append another user to an existing file just leave this off.
-d encrypts the password using crypt, password limit is only 8 characters!
-s encrypts the password using sha1
-D will delete an existing user in the htpasswd file
Type man htpasswd for more switches
How to skip to the end of a file in vi
Replacing characters with vi
:%s/foo/bar/g
:%s/foo/bar/gc
:%s/\<foo\>/bar/gc
:set ignorecase
:set noignorecase
Go to the last line in a file using vi
Upgrade your Ubuntu distro to the newer version
Show previous reboots, logins, shutdowns etc
last reboot
The immutable bit
chattr +i file.txt
lsattr file.txt
chattr -i file.txt
Show detailed information about a file with the stat command
Change the document root in Apache on Ubuntu
Edit /etc/apache2/sites-available/000-default.conf
Change the document root accordingly:
DocumentRoot /var/www
Show what version of Ubuntu you are running
lsb_release -sdc
Fedora 20 firewall and enabling services by default guide
Services
List the startup status of all services. Pipe it into grep to find a particular service. Enable means the service is starting at startup, disable means it isn't.
systemctl list-unit-files
systemctl enable httpd
systemctl disable NetworkManager
Reload the firewall configuration, any non-permanent changes will be lost.
firewall-cmd --reload
firewall-cmd --list-services
firewall-cmd --add-service=http
firewall-cmd --remove-service=http
firewall-cmd --permanent --add-service=http
firewall-cmd --permanent --remove-service=http
firewall-cmd --list-ports
Temporarily open a port/protocol eg 443/tcp:
firewall-cmd --add-port=443/tcp
firewall-cmd --remove-port=443/tcp
firewall-cmd --permanent --add-port=443/tcp
firewall-cmd --permanent --remove-port=443/tcp
Running previous commands
Rerun the previous command:
!!
How to create a YUM custom repository
Step 1: Install createrepo:
yum install createrepo
mkdir -p /repository/packages
createrepo /repository
Example Custom YUM Repository Configuration file: /etc/yum.repos.d/custom.repo
[customrepo]
name=Custom Repository
baseurl=file:///repository/
enabled=1
gpgcheck=0
View current bandwidth usage with iftop
To monitor a particular interface eg eth2 (rather than the default), type iftop -i eth2
This is necessary for when working on devices with more than one NIC.

Proxy Server Setup Guide
This guide explains how to set up a web proxy on Ubuntu. The proxy consists of three
separate products, squid3 (provides web caching and authentication), dansguardian
(filters out webpages based on some kind of algorithm) and apache (used to display
content blocking messages by dansguardian).
apt-get install squid3
ufw allow 3128
apt-get install dansguardian
ufw allow 8080
vi /etc/dansguardian/lists/exceptionsitelist
smh.com.au
How to install dig and nslookup on CentOS
yum install bind-utils
How To Relay Email On A Postfix Server
You need an email account with your ISP which you are going to use as an SMTP relay.
/etc/postfix/main.cf
smtp_sasl_auth_enable = yes
smtp_sasl_security_options = noanonymous
smtp_sasl_password_maps = hash:/etc/postfix/saslpasswd
smtp_always_send_ehlo = yes
relayhost = mail.iinet.net.au
mail.iinet.net.au yourlogin:yourpassword
postmap /etc/postfix/saslpasswd
/etc/init.d/postfix restart
What is Greylisting?
Greylisting is a method of defending e-mail users against spam. A mail transfer agent (MTA) using greylisting will "temporarily reject" any email from a sender it does not recognize. If the mail is legitimate the originating server will, after a delay, try again and, if sufficient time has elapsed, the email will be accepted.
# 1=on 0=off
GREYLISTING=0
Whitelisting senders from Greylisting
You may notice in /var/log/mail.log that some incoming mail is temporarily rejected (greylisted). Because of this the sending mail server is forced to retry to deliver the mail, but unfortunately not all mail servers do this and you can miss out on legitimite mail.
service cbpolicyd restart
Configure CentOS to use a web proxy
Configure wget to work with your proxy settings:
vi /etc/wgetrc
https_proxy = http://proxy.yourdomain.com:8080
http_proxy = http://proxy.yourdomain.com:8080
ftp_proxy = http://proxy.yourdomain.com:8080
http_proxy=http://proxy.yourdomain.com:8080
proxy_user=user
proxy_password=password
vi /etc/sysconfig/rhn/up2date
enableProxy=1
enableProxyAuth=1
httpProxy=http://proxyserver.com:8080
proxyUser=domain\username
proxyPassword=password
wget script that pulls down an entire website into a date-stamped folder
# Set a variable with the current time
time_stamp=$(date +%Y-%m-%d-%T)
mkdir -p "${backuppath}/home/beare/${time_stamp}"
cd "${backuppath}/home/beare/${time_stamp}"
wget --limit-rate=200k --no-clobber --convert-links --random-wait -r -p -E -e robots=off -U mozilla http://nickbeare.com
Scan for Hard Drives
You can scan for all block devices that may be used as physical volumes with:
lvmdiskscan
Configuring NTP clients
Firstly, check whether the selected NTP server is accessible:
ntpdate -q 0.rhel.pool.ntp.org
ntpdate 0.rhel.pool.ntp.org 1.rhel.pool.ntp.org
vi /etc/ntp.conf
server 1.rhel.pool.ntp.org iburst
What is the difference between ntpd and ntpdate
ntpd is a daemon that runs to keep your time up to date. For ntpd you configure /etc/ntp.conf and tell it where to go for time.
Show whether OS is 32 or 64 bit
getconf LONG_BIT
Obtain DHCP address
The below command should take down an interface, bring it back up and trigger DHCP.
dhclient
Configure a bonded interface
Bonding is a Linux kernel feature that allows the aggregation of multiple like
interfaces (eg eth0 and eth1) into a single virtual link such as bond0. Benefits of
bonding include higher data rates and link failover.
# cd /etc/sysconfig/network-scripts
# vi ifcfg-bond0
DEVICE=bond0
IPADDR=192.168.122.12
NETMASK=255.255.255.0
GATEWAY=192.168.122.1
NM_CONTROLLED=no
BOOTPROTO=none
ONBOOT=yes
USERCTL=no
# vi ifcfg-eth0
DEVICE=eth0
USERCTL=no
ONBOOT=yes
NM_CONTROLLED=no
MASTER=bond0
SLAVE=yes
BOOTPROTO=none
# vi /etc/modprobe.d/bonding.conf
alias bond0 bonding
options bond0 mode=active-backup miimon=100 downdelay=200 updelay=200
alias netdev-bond0 bonding
options bond0 miimon=100 mode=4 lacp_rate=1
modprobe bonding mode=active-backup miimon=100 downdelay=200 updelay=200
# service network restart
How to install Skype on Ubuntu
Add the repository:
sudo add-apt-repository "deb http://archive.canonical.com/ $(lsb_release -sc) partner"
sudo apt-get update >> sudo apt-get install skype
Change default umask for SFTP sessions
vi /etc/pam.d/sshd
session optional pam_umask.so umask=006
Change default umask for SSH/console sessions
You can set the umask in /etc/bashrc or /etc/profile file for all users. Open /etc/profile or ~/.bashrc file, enter:
umask 006
Add SNMP client agent on RedHat variant OS
Install SNMP client:
yum install net-snmp-utils
vi /etc/snmp/snmpd.conf
rocommunity enter_community_string
syslocation "PDC, Beare's DataCenter"
syscontact nick@nickbeare.com
service snmpd restart
chkconfig snmpd on
iptables -I INPUT -p udp –-destination-port 161 -j ACCEPT
netstat -au | grep snmp
snmpwalk -v 1 -c enter_community_string -O e 127.0.0.1
Understanding the RedHat package naming convention and format
RedHat packages use a specific naming convention with the following format:
name-version-release.arch.rpm
Eg: mypkg-2.7-5.x86_64.rpm
The above package is named mypkg, the version is 2.7, the release is 5 and the architecture is 64bit (x86_64).
How To Install Nagios Core version 3 On CentOS 6
Install the necessary packages and configure the nagios service:
rpm -Uvh http://dl.fedoraproject.org/pub/epel/6/x86_64/epel-release-6-8.noarch.rpm:
rpm -Uvh http://rpms.famillecollet.com/enterprise/remi-release-6.rpm
yum -y install nagios nagios-plugins-all nagios-plugins-nrpe nrpe php httpd
chkconfig httpd on && chkconfig nagios on
service httpd start && service nagios start
htpasswd -c /etc/nagios/passwd nagiosadmin
echo "cfg_dir=/etc/nagios/servers" >> /etc/nagios/nagios.cfg
touch host1.cfg
vi /etc/nagios/servers/host1.cfg
use linux-server
host_name nickbeare
alias nickbeare
address 203.173.10.97
}
use generic-service
host_name nickbeare
service_description PING
check_command check_ping!100.0,20%!500.0,60%
}
use generic-service
host_name nickbeare
service_description DNS
check_command check_tcp!53
}
use generic-service
host_name nickbeare
service_description RDP
check_command check_tcp!3389
}
use generic-service
host_name nickbeare
service_description SSH
check_command check_ssh!-p 2222
}
use generic-service
host_name nickbeare
service_description PSWA
check_command check_tcp!443
}
use generic-service
host_name nickbeare
service_description SMTP
check_command check_smtp
}
use generic-service
host_name nickbeare
service_description HTTP
check_command check_http
}
chown -R nagios. /etc/nagios
service nagios restart
/etc/nagios/objects/contacts.cfg
Email subject that triggers spam filters
XJS*C4JDBQADN1.NSBN3*2IDNEN*GTUBE-STANDARD-ANTI-UBE-TEST-EMAIL*C.34X
Change the timezone in Centos6
Copy the relevant timezone from /usr/share/zoneinfo to /etc/localtime, for example to change the timezone to America/Toronto:
cp /usr/share/zoneinfo/America/Toronto /etc/localtime
Configuring Centos as a DNS server
External DNS Guide
LFTP - an rsync equivalent with FTP
In this example we mirror the data from /home/ftp_server/share to our ftp client's machine on /home/ftp_client/share. The FTP username on the remote server is remote_user with the password being remote_password.
lftp -u ftp_username,ftp_passwoed -e 'mirror --reverse --verbose /home/client_files/ /home/ftp_server' 192.168.1.1
Enabliing automatic updates on CentOS and Ubuntu
CentOS - yum -y install yum-cron
The config file is /etc/sysconfig/yum-cron.
Start the service with service yum-cron start and turn it on at boot chkconfig yum-cron on
Open source Hotel booking system
Hotel Druid is a cool booking system. You will need a LAMP stack server to support the application.
How to show line numbers in vi
Hit ESC and type:
:set nu
Hit enter.
Specify port number in ssh-copy-id
Where the SSH port is 8129:
ssh-copy-id "user@host -p 8129"
How to hibernate/sleep from command line in Ubuntu
apt-get install powermanagement-interface
pmi action suspend
pmi action hibernate
How to redirect your website to another website
The below VirtualHost block redirects ntp.nickbeare.com to pool.ntp.org:
<VirtualHost *:80>
ServerName ntp.nickbeare.com
ServerAlias *.ntp.nickbeare.com
Redirect permanent / http://www.pool.ntp.org/
</VirtualHost>
Query NTP Server
Query your NTP server from the Internet:
Link
Install TOR Browser on Ubuntu
sudo add-apt-repository ppa:webupd8team/tor-browser
sudo apt-get update
sudo apt-get install tor-browse
Clearing log files that record login attempts
cat /dev/null > /var/log/secure
cat /dev/null > /var/log/lastlog
cat /dev/null > /var/log/wtmp
cat /dev/null > /var/log/btmp
Script that creates a datestamped folder, backs up a website, and emails a compressed copy
time_stamp=$(date +%Y-%m-%d-%T)
GOT="/web/${time_stamp}"
mkdir -p $GOT
cd $GOT
wget --no-clobber --convert-links --random-wait -r -p -E -e robots=off -U mozilla http://nickbeare.com
cd ..
GOT2="/web/${time_stamp}.tar.gz"
tar -zcvf $GOT2 $GOT
mutt -s "nickbeare.com backup" user@gmail.com -a $GOT2 < /tmp/mailmessage.txt
Authenticate AD Users using Winbind
yum install samba-winbind
chkconfig winbind on
service winbind start
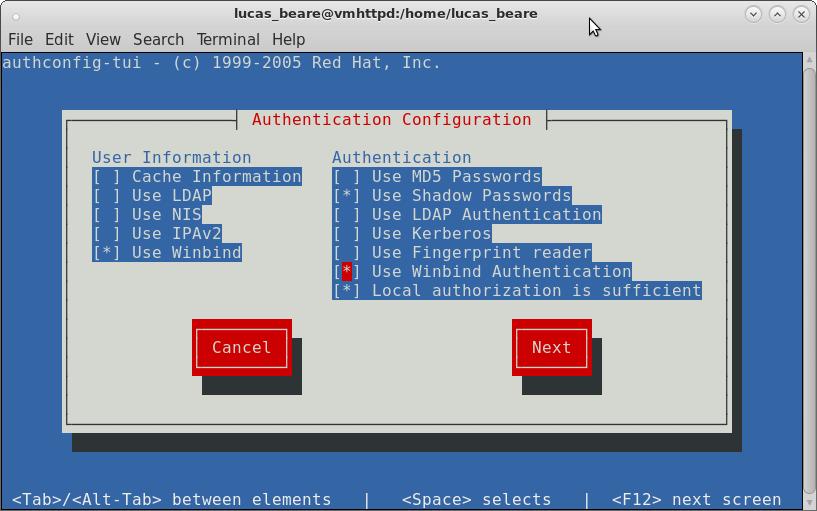
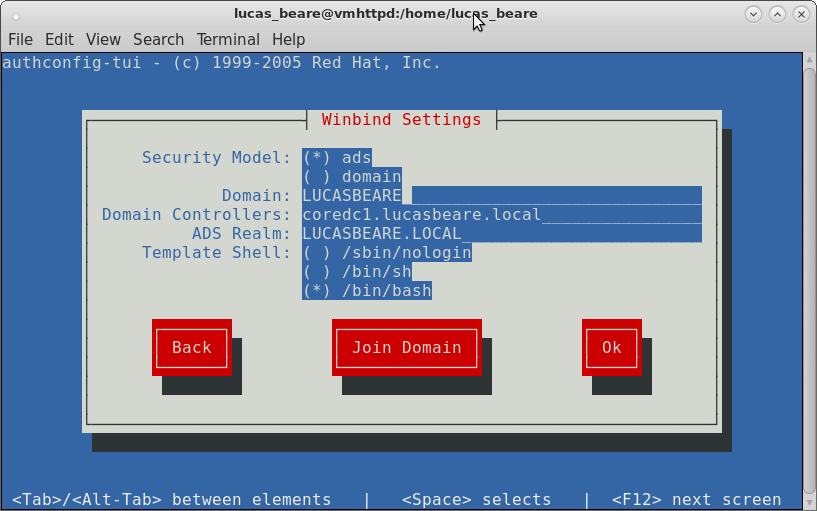
wbinfo -u = lists AD users
wbinfo -g = lists AD groups
id DOMAIN\\username
vi /etc/samba/smb.conf
Change to YES:
winbind use default domain = yes
winbind offline logon = yes
yum install -y oddjob-mkhomedir
service oddjobd start
If oddjobd doesn't start type:
service messagebus start:
Then try and start oddjobd again.
chkconfig oddjobd on
authconfig --enablemkhomedir --update
visudo
%domain\ admins ALL=(ALL) NOPASSWD: ALL
Using mget to download multiple files over sftp
Below command downloads episodes 6 and 7.
mget -r downloads/Game.of.Bones.S05E0[6,7].720p /home/MainMovie/
Scripting SFTP using EOT
sftp -oPort=22 ssdapp@seed:downloads <<EOF
mget * /opt/seed/MainMovie/seed
EOF
Setting up Transmission Remote
There is a great guide for installing Transmission Remote here. The guy has written a script which automates the
install process - creating a user, configuring the daemon, setting up a CSF firewall. After completion you can reach the
Transmission service via a web browser http://hostname:9091
"watch-dir": "/home/downloads/",
"watch-dir-enabled": true,
/etc/init.d/transmissiond status
Using Transmission-Remote from the cmd line
List all torrents including ID, size, completion rate, ratio etc.
transmission-remote -n transmission_username:'password' -l
transmission-remote -n transmission_username:'password' -a /home/user/CentOS_6.torrent
transmission-remote -n transmission_username:'password' -t 1 -f
transmission-remote -n transmission_username:'password' -t 1 -r
transmission-remote -n transmission_username:'password' -t 1 --remove-and-delete
transmission-remote -n transmission_username:'password' -t 1 -i
transmission-remote -n transmission_username:'password' -t 1 -ip
transmission-remote -n transmission_username:'password' -si
transmission-remote -n transmission_username:'password' -st
transmission-remote -n transmission_username:'password' -er
Install DenyHosts on Centos 6
rpm -Uvh http://mirror.metrocast.net/fedora/epel/6/i386/epel-release-6-8.noarch.rpm
sudo yum install denyhosts
service denyhosts start
Remove bash history at log off
Add the below line to your ~/.bash_logout file.
cat /dev/null > /home/username/.bash_history
history -c
history -w
SFTP Net Drive
Allows you to map a drive on your windows PC to an SSH server.
Link
6 ways to see who's logged onto a server
users - show usernames of users currently logged on the server.
Creating an alias for a command
Type alias to view a current list of aliases. You can add an alias:
alias insert_alias_name_here='history -c'
Rsync mirror that uses file size, not last modified date
rsync -rzvP --size-only -e 'ssh -p 22' user@server:/home/user/* /opt/
Run a command indefinitely
You can use nohup to ensure that your command does not stop because you logoff of or your session times out.
nohup cp -rv /home/source /home/destination &
The output will be stored in the nohup.out file in the present working directory.
Running jobs
Launch a job in the background:
sleep 100 &
View background jobs:
jobs
Bring job to foreground, where x is the job number from jobs:
fg x
Stop a fg job and send it to bg:
ctrl + z
Resume a stopped bg job, where x is the job number from jobs:
bg x
Kill a job, where x is job number:
kill %x
Finding files and removing them
Find all files (-f) in /home that have .txt at the end of their name (-iname is case insensitive). The -maxdepth 1 switch/value ensures that results only come from the current directory (/home).
find /home -maxdepth 1 -type f -iname "*.txt"
find /home/tor -maxdepth 1 -type f -iname "*.txt" | xargs --delimiter=\\n rm
View active DHCP leases
vim /var/lib/dhcpd/dhcpd.leases
View current version in CentOS
cat /etc/redhat-release
Encrypt the grub password using grub-crypt
By entering password=insert_password_here in the grub config file, the grub is secured by a password, but the password itself is in clear text in the grub.conf file, which kind of defeats the purpose.
Password: GrbPwd4SysAd$
Retype password: GrbPwd4SysAd$
^9^32kwzzX./3WISQ0C
default=0
timeout=15
password --encrypted ^9^32kwzzX./3WISQ0C
Show all services and their running status
Works on Ubuntu and Red Hat.
service --status-all
Specify a from email address using MUTT
Use -e 'my_hdr From:someone@gmail.com'
Eg:
mutt -e 'my_hdr From:guy@gmail.com' -s "backup" someone_else@gmail.com -a file.html
Count unique IP hits on your Apache Web Server
cat /var/log/httpd/access_log | awk '{print $1}' | sort | uniq | wc -l
How to create multiple directories
mkdir -p new_dir/{dir1,dir2}
List all services and their running and startup states in CentOS 7
systemctl list-unit-files
Searching for multiple words with grep
rpm qa | grep -w 'vim\|screen\|git'
A Loop to create multiple groups
for group in group1 group2 group3 ;

do groupadd -r ${group} ;

done
How to go back to your previous directory
cd -
How to copy a file into vim:
Hit ESC then:
:r /tmp/filename.txt
How to push files from source to destination using Rsync
Make sure rsync is installed on client and server. In the below example SSH is running on port 2223. The local contents of /local/source are pushed up to /home/remote on remote
rsync -avz /local/source -e 'ssh -p 2223' user@remote:/home/remote
Securing your Apache web dirs and files
These perms are secure enough and should allow enough functionality for most websites.
find /var/www/html/nickbeare.com -type d -exec chmod 755 {} \;

find /var/www/html/nickbeare.com -type f -exec chmod 644 {} \;
How to encrypt a folder on CentOS
EncFS is an easy to use encryption program available in the EPEL repo.
yum install encfs -y
Create your encrypted and decrypted folders using EncFS:
encfs ~/enc_folder ~/dec_folder
Enter 'p' when prompted, followed by your password that you will use to decrypt the directory.
Now any files or folders created in the dec_folder will appear as encrypted files in the enc_folder.
To unmount the dec_folder type:
fusermount -u ~/dec_folder/
To retrieve the data again run the below and enter the password you set earlier:
encfs ~/enc_folder/ ~/dec_folder
Be sure to remember your password, there is no way to reset it or access the data without it.
Download a mirror of a website using httrack
A simple example:
httrack "http://www.all.net/" -O "/tmp/www.all.net" "+*.all.net/*" -v
How to change what VLAN your server is assigned to on a Cisco switch
First determine what switch interface your server is on by matching your server's NIC MAC address to an interface. Note which VLAN the port is assigned to.
show mac address-table You can also note which VLAN a port is assigned to by running:
show vlan br To change the assigned VLAN enter configuration mode:
conf t Select the appropriate interface eg Eth1/11:
interface Eth1/11 Change the assigned VLAN eg to VLAN 1:
switchport access vlan 1
How to delete large numbers of files using bash
If you try to remove an extremely high number of files with the rm command, you can receive an error stating the argument list is too long. One way to get around this is to cd to the directory where you want to delete the files and run the below. Note, this will remove ALL files in the current dir.
Find . –type f –print –delete
Searching through files for specific content
grep –rn “Some Message” /opt/some_parent_dir
Show traffic on an interface
tcpdump -i eth0 -nn
How to install and run RKHunter
CENTOS:
yum install rkhunter
Update definitions:
rkhunter --update
Update local DB:
rkhunter --propupd
Run a check:
rkhunter --check -sk
In Ubuntu you will need to make some changes to vi /etc/rkhunter.conf:
UPDATE_MIRRORS=1
MIRRORS_MODE=0
WEB_CMD=""
And...
vi /etc/default/rkhunter
Make changes to cron set up here ie
CRON_DAILY_RUN="true"
How to clone a Hard Drive
On the computer you want to clone the HD from run the below command to get the current block size of the disk. Run lsblk to get the partition name.
sudo blockdev --getbsz /dev/sda1
Next, connect a second hard drive of an equal or larger size and boot your computer from a USB device into a Live Linux OS.
Run the below command with the blocksize (bs) that you got from the command you ran earlier.
dd if=/dev/sda of=/dev/sdb bs=4096
You will need to wait for quite a while with no screen output while the copy takes place. Once DD is complete, power off, remove the USB and unplug your original drive. You can then boot off the new drive. In the event that the new drive eventually fails you can replace it with the original drive and boot from there.
You can also dump the live OS to an image on a separate mounted drive using dd:
sudo dd if=/dev/sdb of=/mnt/backup/workstation.image
Restoring it is also done by dd:
dd if=/mnt/backup/workstation.image of=/dev/sda
Create a SHA512 password hash with salt that can be understood by /etc/shadow
openssl passwd -6 -salt somesalt mycomplexpassword

$1$kwewdcmeicnweocnw

usermod root --password '$1$kwewdcmeicnweocnw'
Check the hashes of each file in a directory recursively
find –type f –not –path ‘*/\.*’ –exec md5sum “{}” + | sort –k 2
Obtain SSL Cert Details
openssl s_client -showcerts -connect 127.0.0.1:443
xubuntu blinking cursor no x windows
When plugging my xubuntu HD into new computers xorg always seems to break.

The OS boots and then after the hard drive is shown as clean I get a blinking cursor.

Sometimes I can't even change tty or get a console and have to boot from a live USB.

The below commands reconfigure xorg so I can get a GUI:

# Backup the existing config first.

cp /etc/X11/xorg.conf /etc/X11/xorg.conf.backup

service lightdm stop

X -configure

mv xorg.conf.new /etc/X11/xorg.conf

service lightdm start
Create a USB bootable ISO using DD
Use lsblk to confirm what device the USB drive is and make sure it's unmounted.

dd if=/home/bmon/Downloads/lubuntu-20.04.3-desktop-amd64.iso of=/dev/sdc bs=4M && sync
Recursively shred files in a directory
find /tmp/somedir -exec shred -uvzn 3 {} \;
Install ESXi 7.0.u3 on HP DL380 Gen7
The install will fail saying that the CPU is unsupported.  However, the CPUs are compatible!

After the ESXi boot menu when the “Loading ESXi Installer” is starting click SHIFT+O within 5 seconds to add boot options.

Type “ allowLegacyCPU=true” behind the line.  I didn't have to do anything to make this change permanent.

source: https://flemmingss.com/how-to-run-vmware-esxi-7-0-on-hardware-with-unsupported-cpus/
Remote management of an ESXi host
Run dcui from an ssh session and you get the same console that is visible from a direct monitor connection.
Getting NFS client working on Windows
On the NFS server I had to add two services in the firewall - nfs AND mountd.

To mount the share from windows you need to add NFS client feature.

Mount commmands:

See available mounts:

showmount -e 192.168.1.90

Mount:

mount 192.168.1.90:/sharename z:
Getting Linux to authenticate against AD
After joining linux to AD I had issues with authentication. Issue was in my sssd.conf, working sample below.
cat /etc/sssd/sssd.conf

[sssd]
domains = beareware.com
config_file_version = 2
services = nss, pam
default_domain_suffix = beareware.com

[domain/beareware.com]
ad_domain = beareware.com
krb5_realm = BEAREWARE.COM
realmd_tags = manages-system joined-with-adcli
cache_credentials = True
id_provider = ad
krb5_store_password_if_offline = True
default_shell = /bin/bash
ldap_id_mapping = True
use_fully_qualified_names = True
fallback_homedir = /home/%u@%d
access_provider = simple
ad_hostname=tozza.beareware.com
simple_allow_groups = Domain Admins
simple_allow_users = bmon
Installing Deluge Daemon and Web UI on CentOS Stream 8
Source: https://snapcraft.io/install/deluge-lukewh/centos
Unblocking blocked SSH IPs in fail2ban
Show banned list:
fail2ban-client status sshd

Show firewall rule blocking ip:
iptables -n -L --line-numbers

Remove rule (replace f2b-sshd with chain name and 1 with
the number of the desired rule):
iptables -D f2b-sshd 1

To permanently remove the ban run the below.  The above only
removes the firewall rule!
fail2ban-client set sshd unbanip 192.168.1.90
Backing up esxi config
To synchronize the configuration changed with persistent
storage, run this command:
vim-cmd hostsvc/firmware/sync_config
To back-up the configuration data for the ESXi host, run:
vim-cmd hostsvc/firmware/backup_config
Source: https://kb.vmware.com/s/article/2042141#ESXi_Command_Line
Extract rar files in CentOS
Unrar won't work, use "unar"!
Setting default permissions
setfacl can apply default permissions for files and directories:
$ setfacl [OPTIONS] [PERMISSIONS] [FILE|DIRECTORY]
Apply default permissions for files and directories under /home
$ setfacl -PRdm u::rwx,g::rw,o::r /home

-d sets the default permission for the /home directory
-m signifies that we want to make changes to the ACL
-R will apply the permission to all the files and
subdirectories in the /home folder recursively
-P will prevent the operation from following symbolic links

The pattern afterward specifies the default permissions for the
/home directory.

You can use uid or gid to set permission for a user and/or group:
$ setfacl -PRdm u:1001:rw /home
Custom script to monitor deluge torrents and extract them
SCRIPT 1 - Use the execute plugin in deluge to execute
the below script to log the completion of torrents to /var/log/messages
#!/bin/bash
# Verbose output
set -x

exec 3>&1 4>&2
trap 'exec 2>&4 1>&3' 0 1 2 3
exec 1>/tmp/extractor-log.out 2>&1
# Everything below will go to the file 'log.out':

torrentid=$1
torrentname=$2
torrentpath=$3

log()
{
    logger -t deluge-extractarchives "$@"
}

log "Torrent complete: $@"

SCRIPT 2 - Create this script to monitor /var/log/messages
 and trigger an extraction script when completed torrents are logged:
#!/bin/bash
set -x

exec 3>&1 4>&2
trap 'exec 2>&4 1>&3' 0 1 2 3
exec 1>/tmp/log-mon.out 2>&1

tail -fn0 /var/log/messages | \
while read line ; do
        echo "$line" | grep "Torrent complete:"
        if [ $? = 0 ]
        then
                line2=$(tail -1 /var/log/messages)
                echo "${line2#*:}"
                /home/user/extract2.sh ${line2#*:}
        fi
done

SCRIPT 3 - The extraction script that decompresses the downloaded files.
#!/bin/bash
set -x
exec 3>&1 4>&2
trap 'exec 2>&4 1>&3' 0 1 2 3
exec 1>/tmp/extractor2-log.out 2>&1
# Everything below will go to the file 'log.out':

formats=(zip rar)
commands=([zip]="unzip -u" [rar]="unar")
extraction_subdir='extracted'

base="/home/bmon@beareware.com/movies/"

cd "${base}"
for format in "${formats[@]}"; do
    while read file; do
        cd "$(dirname "$file")"
        file=$(basename "$file")
        # if extraction_subdir is not empty, extract to subdirectory
        if [[ ! -z "$extraction_subdir" ]] ; then
            mkdir "$extraction_subdir"
            cd "$extraction_subdir"
            file="../$file"
        fi
        ${commands[$format]} "$file"
    done < <(find "${base}" -iname "*.${format}" )
done
Enabling wake on lan (WOL) in CentOS
Enable WOL on the client that is being activated:
sudo ethtool -s ethx wol g

Required package on the endpoint send the WOL:
yum install net-tools

Send the wake on lan packet:
ether-wake ec:b1:d7:3b:60:00
Encrypt a variable using ansible vault
ansible-vault encrypt_string enter-string-here --ask-vault-pass

Then use the output in your host var file:
private_key: !vault |
          $ANSIBLE_VAULT;1.1;AES256
          63663737356563636232623662306662666631313037376

When running the ansible play ask for the vault password:
ansible-playbook roles/lounge.yml -u user --ask-vault-pass
Note it does not appear work well with strings that contain
special characters.

To encrypt the whole file use:
ansible-vault encrypt sample.yml

Decrypt:
ansible-vault decrypt secure.yml

Edit:
ansible-vault edit secure.yml
Testing network throughput using iperf
Default port is 5001

On server:
Listen on UDP
iperf -s -u

Listen on TCP
iperf -s

On client:
iperf -c remote-server -n 50m -u


Remove a host from ssh known hosts file

ssh-keygen -R hostname


Generate a hashed password that can be used by ansible

This command (single line) creates a password hash that can be
used by ansible to change the users password.
python3 -c 'import crypt,getpass;pw=getpass.getpass();
print(crypt.crypt(pw) if (pw==getpass.getpass("Confirm: "))
else exit())'


How to patch a standalone free ESXi server

ESXi patches are cumulative, hence get the latest.
Downloadable from:
https://customerconnect.vmware.com/patch
Upload the patch (zip file) to a datastore on the host.
Put the host in maintenance mode.
Enable SSH and SSH to the ESXi server as root.
Confirm current patch version:
vmware -v
Update the host using the zip file you uploaded previously:
esxcli software vib update
--depot=/vmfs/volumes/Data/patches/VMware-ESXi-7.0U3k-21313628-depot.zip
Wait for output on the terminal saying patch successful.
Reboot the host.
Confirm the new build version:
vmware -v


Mounting a file share using SSH

Install sshfs:
apt install sshfs

Mount the remote share locally (note, add -o IdentityFile=/home/username/.ssh/id_rsa to use an ssh key):
sshfs -o allow_other,default_permissions name@lin:/home/n/git /home/n/lin/

Make the mount automatic (pretty sure root needs the ssh private key for this)
NOTE this doesn't work at boot!
cat /etc/mtab  | grep lin >> /etc/fstab