PowerShell Bible
How to display general info about a computer:get-wmiobject -class win32_computersystem
Domain :
Manufacturer :
Model :
Name :
PrimaryOwnerName :
TotalPhysicalMemory :
Get PowerShell version info
get-host
$psversiontable
get-process
List all processes:
get-process
List all processes and sort by CPU:
get-process | sort CPU
Show the top 5 CPU consuming processes:
get-process | sort CPU | select -last 5
stop-process
Stop a process by process id number:
stop-process pid_number
Stop a process by name:
stop-process - name processname
get-counter
Shows the available amount of RAM.
Get-Counter '\Memory\Available MBytes'
Shows a continually updating record of the current CPU utilisation.
Get-Counter -counter "\processor(_total)\% processor time" -continuous
Similar to the above command except it only displays the CPU utilisation three times with a sample interval of two seconds. Note, as with all counters, it can be used with the 'computername' parameter to target remote PCs.
Get-Counter -Counter "\Processor(_Total)\% Processor Time" -SampleInterval 2 -MaxSamples 3 -computername 55cv12s
Shows the percentage of free disk space.
Get-Counter -Counter "\LogicalDisk(_Total)\% Free Space"
How to clear the screen in powershell
clear-host
clear
Show Disk Utilisation
Shows the disk utilisation of all drives:
Get-WMIObject Win32_LogicalDisk | Select SystemName,DeviceID,VolumeName,@{Name="size(GB)";Expression={"{0:N1}" -f($_.size/1gb)}},@{Name="freespace GB)";Expression={"{0:N1}" -f($_.freespace/1gb)}}
Sample Output
SystemName : 3JSPD2S
DeviceID : C:
VolumeName : System
size(GB) : 465.8
freespace GB) : 383.9
If you don't want to see network and USB drives use:
Get-WMIObject Win32_LogicalDisk -filter "DriveType=3" | Select SystemName,DeviceID,VolumeName,@{Name="size(GB)"; Expression={"{0:N1}" -f($_.size/1gb)}},@{Name="freespace(GB)";Expression={"{0:N1}" -f($_.freespace/1gb)}}
The following command allows you to view disk usage information for a list of hosts.
Get-WMIObject Win32_LogicalDisk -filter "DriveType=3" -computer (Get-Content c:\computers.txt) | Select SystemName,DeviceID,VolumeName,@{Name="size(GB)"; Expression={"{0:N1}" -f($_.size/1gb)}},@{Name="freespace(GB)";Expression={"{0:N1}" -f($_.freespace/1gb)}}
Here is an example of a c:\computers.txt file:
server1 [hit enter key]
laptop2 [hit enter key]
Desktop1 [hit enter key]
Installing and enabling Telnet Server
First, install the Telnet service
install-windowsfeature "telnet-server"
View the status of your Telnet service:
get-service telnet
Before you can start the service you need to enable it. In this example we set it to startup automatically.
set-service tlntsvr -startup "automatic"
Now we can start the Telnet service
start-service telnet
Note: Telnet users need to be added to the 'TelnetClients' group in order to use Telnet.
How to rename your computer using PowerShell
Run the below command to change your computer name. Note, your computer name won't change until you restart.
Rename-Computer -NewName "Windows8"
How to launch a program from PowerShell
Type '& /path_to_program/program.exe' eg:
& "C:\Program Files\Internet Explorer\iexplore.exe"
How to execute powershell scripts
In Windows Server 2012 there is a default execution policy setting that prevents you from running external/custom powershell scripts (.ps1). Type either of the below commands to remove this restriction.
Allows you to run locally created scripts: Set-ExecutionPolicy RemoteSigned
Allows you to also run scripts downloaded from the web: Set-ExecutionPolicy Unrestricted
To view you current execution policy type:
Get-ExecutionPolicy
For more info on execution policy type:
help about_execution_policy
Powershell equivalent to the 'find' command
Use 'select-string' eg:
get-content C:\hi.txt | Select-String "world"
How to rename a file in powershell
ren C:\old_name.txt c:\new_name.txt
Powershell equivalent to ipconfig
List interfaces configured with IPv4 addresses:
Get-NetIPAddress -AddressFamily IPv4
Modify properties of an existing IP address:
Set-NetIPAddress -InterfaceIndex 12 -IPAddress 192.168.0.1
Create a new IP address:
new-NetIPAddress -InterfaceIndex 12 -IPAddress 192.168.0.1
PowerShell Help
To download the help files from the Microsoft website over the Internet type:
update-help
The above can only be performed once every 24 hrs. To force the update right now type:
update-help -force
To save your help file locally:
save-help c:\destination
You can download the help file from a local source:
update-help -sourcepath
The below examples show you to read help files on an example cmdlet, get-service.
Shows all help info:
help get-service -full
Only shows the examples:
help get-service -example
Show help in a new window:
help get-service -showwindow
Opens the help in Internet Explorer from an online source:
help get-service -online
Using 'get-command' to identify cmdlets and functions based on '-verb' and '-noun'
The below command will list all cmdlets and functions:
get-command
Commands are broken down as verbs (actions) and nouns (things), eg 'get-command', get=verb and command=noun.
List commands that include printer (noun):
get-command -noun *printer*
List commands that begin with 'add' (verb):
get-command -verb add*
You can also search for particular commands, for example if you are looking for GPO related cmdlets:
get-command | select-string gpo
How to view an event log
Type 'get-eventlog' and then specify the name of the log eg security. The information doesn't display well in powershell. Export it to a csv file and then import it into powershell to view all details:
get-eventlog Security | export-csv -path c:\sample.csv
import-csv -path C:\sample.csv
Using 'show-command' to help you type commands
You can type the below to launch a GUI to assist you in creating a command such as 'new-aduser'. After you have completed using the GUI you can copy the contents of the command and paste it in powershell.
show-command get-aduser
'whatif' and 'confirm'
These parameters can be added to the end of commands to provide the below functionality
new-aduser -name bob -whatif - won't actually run the command, but will show you what the command would have done.
new-aduser -name bob -confirm - will prompt you to confirm before actually executing the command.
How to create a 'file' or 'directory' from the command line
Create a file:
new-item -path c:\ -type file -name hi.txt -value "Hello World"
Create a directory:
new-item -path c:\ -type directory -name hello_world_folder
Providers - an adapter between storage and the shell
List powershell providers:
get-psprovider
List drives in the current session:
get-psdrive
You can map a drive with new-psdrive. This is like the old 'net use' command. The below command maps c:\appdata to the x: drive. You can add -persist to make the drive statically mapped.
New-PSDrive -Name x -PSProvider filesystem -Root C:\AppData\
Listing folder contents
get-childitem
ls
dir
'get-item' and modes
You can use get-item to show similar information as 'get-childitem', but you can contain it to an individual directory or file.
The output of 'get-item' lists a Mode section, this is explained below:
d - Directory
a - Archive
r - Read-only
h - Hidden
s - System
How to list the contents of a file
The below command prints the contents of a file to the screen. You can also use 'cat':
get-content C:\hi.txt
Opening a file with notepad from powershell
notepad c:\sample.txt
Exporting output to .csv and .xml files
Export the output of get-process to a csv file:
get-process | export-csv -path c:\sample.csv
Export the output of get-process to an xml file:
get-service | export-clixml -path c:\services.xml
Comparing the difference between two objects
In the below example, we have a csv file holding the contents of a previous 'get-process' command. We are comparing the difference between this file and a current 'get-process' command.
compare-object -referenceobject (import-csv x:\process.csv) -differenceobject (get-process) -property name
The ouput of the command will display the difference between the two outputs eg any processes that have started since the creation of x:\process.csv.
The below command uses the -includeequal parameter to compare two text files and mark objects that exist in both files with a = symbol.
compare-object -referenceobject (get-content h:\h_drives.txt) -differenceobject (get-content h:\separated_staff.txt) -includeequal | export-csv h:\separated_staff_with_a_h_drive.csv
Importing a .csv file
import-csv -path C:\process.csv
Using 'out-file' to export output to standard text
'out-file' retains formatting.
get-service | out-file -filepath x:\sample.txt
Exporting output to gridview
Gridview allows you to apply filters to output. It displays the output in a new GUI window.
get-service | out-gridview
Converting output to a HTML file
get-service | convertto-html | out-file -filepath c:\sample.html
Modules
Modules such as Active Directory and Exchange can be added into PowerShell. They can then be manipulated using PowerShell commands.
To list the available modules:
get-module -listavailable
To add a module such as AD
import-module activedirectory
You can view all commands for the module
get-command -module activedirectory
List aliases for a command
You can use 'get-alias' to list shortcuts for commands. Eg gsv = get-service.
get-alias -definition get-service
How to list installed programs on a remote PC
The below command lists all installed programs on a remote machine named 1kcb92s. If you don't include the -computername parameter it will show software installed on your local computer.
Get-WmiObject -class win32_product -computername 1kcb92s
You can try to return particular results by pipeing the output through select-string:
Get-WmiObject -class win32_product -computername 1kcb92s | select-string "Visio"
How to determine if a CPU is 32 or 64 bit architecture
Get-WmiObject -class "Win32_Processor" | select-object "AddressWidth"
If the AddressWidth is "32" then you're on a 32-bit operating system.
If the AddressWidth is "64" then you're on a 64-bit operating system.
Another way is:
get-wmiobject -class win32_operatingsystem | select-object -property "osarchitecture"
Lists users in a group and export the results to a csv file
The below command lists all members of the group "insert group name" and extracts the "givenname" and "surname" properties. It then extracts the data to a csv file.
get-adgroupmember "insert group name" | get-aduser | select-object -property "givenname", "surname" | export-csv "C:\stuff\members.csv"
To combine the columns "givenname" and "surname" with Excel you can create a new column with the below formula. This formula assumes that "givenname" is in column A and "surname" is in column B.
=A1&" "&B1
List all groups that a user or computer is a member of
Add the relevant username in place of "insert_username"
(get-aduser -identity insert_username -properties MemberOf | select-object MemberOf).MemberOf
A simpler and more concise way to display AD group membership for a username or computername is:
Get-ADPrincipalGroupMembership -identity username/computername | select-object -property "name"
If you are having trouble getting the above command to work with a computername, try:
Get-ADComputer -identity computername | Get-ADPrincipalGroupMembership | select-object -property "name"
Using Get-Member to view all properties of a class
Lets say you want to extract information from your system using get-wmiobject. The below command will get information about some properties from the win32_operating system class such as organization and buildnumber.
get-wmiobject -class win32_operatingsystem
To see all properties available to the WMI class, win32_operatingsystem, use get-member.
get-wmiobject -class win32_operatingsystem | Get-Member
Now lets say you want to grab the ProductType property. You can use the format-table command to extract this property
get-wmiobject -class win32_operatingsystem | Format-Table -Property producttype
Using Test-Connection to ping several computers
The below script allows you to ping several computers and store the results in a text file. It will list the hostname and whether or not it was pingable. This single column can easily be split into two in Excel using the 'text to column' feature and by selecting space as a deliminator.
get-content h:\names.txt | foreach { if (test-connection $_ -quiet) { write-output "$_ pingable" | out-file h:\results.txt -append } else { write-output "$_ down" | out-file h:\results.txt -append}}
How to print from powershell
The below command prints the phrase "hello world" on a network printer called 'printer'
"hello world" | out-printer -name "\\print_server\printer"
Finding inactive computer objects in Active Directory
The below command returns all Windows XP machines along with their "passwordlastset" property. The "passwordlastset" property refers to a computer password that is renewed every 30 days. If a computer has a "passwordlastset" date older than 30 days ago it is likely that the machine is no longer in use on the domain and can be deleted from Active Directory.
get-adcomputer -filter {operatingsystem -eq "Windows XP Professional"} -property * | select-object "name","operatingsystem", "passwordlastset" | sort-object -property "passwordlastset" | export-csv -path "C:\stuff\xp_machines.csv"
Creating and using restore points
To create a restore point with a description of "Test restore point" type:
checkpoint-computer -description "Test restore point"
The below command lists all of the restore points on the computer.
get-computerrestorepoint
The following command allows you to restore you computer using a restore point. In this case restore point 253. You can clarify the ID number of a restore point by using get-computerrestorepoint.
restore-computer -RestorePoint 253
Show the last user logon date for a computer
'lastlogon' is updated reasonably regularly and indicates the last time a user logged onto the machine.
Get-ADcomputer -identity hostname -properties Name,LastLogon | Select-Object Name,@{n='LastLogon';e={[DateTime]::FromFileTime($_.LastLogon)}}
Find a computer's last boot time
get-wmiobject -class win32_operatingsystem -computername hostname | select name,@{l='lastboottime';e={$_.converttodatetime($_.lastbootuptime)}}
Show the username of whoever is currently logged onto a computer
get-wmiobject -computername hostname -class win32_computersystem -property * | select-object username,name
The below command does the same as the above, but with a list of PCs contained within a file named computer_names.txt. It also exports the result to a CSV file.
get-wmiobject -computername (get-content c:\computer_names.txt) -class win32_computersystem -property name,username | select-object username,name | export-csv c:\results.csv
Identifying unused/old AD user accounts
The 'lastlogondate' is a useful property for identifying unused AD user accounts using the Get-ADUser cmdlet. A user's lastlogontimestamp value gets updated once every 12 days or so, no matter how often that user logs on during that time period.
get-aduser -filter * -property displayname,samaccountname,lastlogondate | select-object -property displayname, samaccountname,lastlogondate | export-csv h:\old_ad_accounts.csv
How to display all AD user accounts in a particular OU
Use the -searchbase parameter and specify the OU. You can locate the appropriate identifer for the OU by right clicking on the OU in 'AD User and Computers' and selecting properties. Make sure you have 'Advanced Features' ticked under 'View' on the toolbar. Click the 'Attribute Editor' tab and look for the 'distinguishedname' attribute.
get-aduser -searchbase "OU=Staff,OU=BHP,DC=biliton,DC=corporate" -filter * -property "displayname","samaccountname","canonicalname"
How to run Get-ADUser against a list of users
You can simply pipe the contents of the file into the Get-ADUser cmdlet. It will run the command against each user in the file. The below command pipes a list of usernames into get-aduser and converts each of them into the fullname of the user.
get-content h:\username.txt | get-aduser -property "displayname" | select-object -property "displayname"
How to obtain the model number of a PC and the total amount of RAM
The win32_computersystem contains a lot of useful information such as a PC's model number and total physical memory. The below commands reads a list of PCs as input to the get-wmiobject cmdlet. It selects each machines name, model, currently logged on user, total physical memory (including conversion from bytes to Gb) and exports the result to a CSV file.
get-wmiobject -class win32_computersystem -computername (get-content c:\computer_names.txt) -property * | select-object -property "__server","model","username",@{label="totalphysicalmemory";expression={[int]($_.totalphysicalmemory/1gb)}} | export-csv "c:\results.csv"
How to use Get_ADUser to determine if a user has an active mailbox
An AD user account with a deleted mailbox can still have an email address property listed in AD. However, the 'msexchmailboxguid' is only displayed for users who have a mailbox. If a user's mailbox has been removed then they will no longer have a 'msexchmailboxguid'. This property is a useful way to determine if a user has a mailbox, without using the Exchange Management Module.
get-aduser -identity username -property * | select-object -property "emailaddress", "msexchmailboxguid", "name", "displayname"
How to display a PC's serial number and BIOS version
Use the WMI win32_bios class.
get-wmiobject -class win32_bios -computername hostname
Display AD group membership for a list of users
The below command takes a list of usernames and returns the AD group membership of each user. Note, the = and ^ symbols are for display purposes only and make the information easier to read.
$users = get-content "h:\users.txt" ; foreach ($user in $users) {($user | Get-ADPrincipalGroupMembership | select-object -property "name") + "==========================" + "^$user^" + "=========================="}
Display AD group membership for a list of computers
The below command takes a list of computer names and returns the AD group membership of each computer. Note, the = and ^ symbols are for display purposes only and make the information easier to read.
$computers = get-content "h:\computers.txt" ; foreach ($computer in $computers) {($computer | Get-ADComputer | Get-ADPrincipalGroupMembership | select-object -property "name") + "==========================" + "^$computer^" + "=========================="}
Filtering get-wmiobject searches
Use the - filter parameter with ' name like' to refine your result. The % symbol can be used as a wildcard. * is not accepted. The below command will output the computer name (__SERVER) plus any software product name (name) that begins in ' Microsoft Office' .
get-wmiobject -class win32_product -filter "name like 'Microsoft Office%'" | select-object "__SERVER", "name"
Using Set-ADUser and Move-ADObject
The below PowerShell command reads a text file of AD user accounts (ObjectGUIDs). It moves each user into a new OU as indicated by the distinguished name in the targetpath parameter.
get-content c:\objectguids.txt | move-adobject -targetpath "OU=Contractors,OU=Users,OU=BHP,DC=Biliton,DC=Corporate"
The below PowerShell command edits the company field (AD user object attribute) for all users listed in a text file (ObjectGUIDs).
get-content c:\objectguids_CGI.txt | set-aduser -Replace @{company='CGI'}
The difference between Disabling and Removing an Exchange mailbox in Exchange 2007/2010
In the Exchange Management Console when a mailbox is selected the actions pane shows two tasks; Disable and Remove.
Disable will remove the Exchange attributes for the user account but leave the user account in Active Directory. The mailbox is then also left in the Exchange mailbox database until the retention period has lapsed (30 days), then it is removed permanently.
Remove will remove both the Exchange mailbox and the user account from Active Directory
Disable is the safest option, because you can quickly reconnect the mailbox to the user again if it is still within the retention period of 30 days.
PowerShell Exchange mailbox commands
Enable-Mailbox is for creating a mailbox for an existing user, and Disable-Mailbox removes only the Exchange attributes from the user account
New-Mailbox is for creating a new AD user and mailbox at the same time, and Remove-Mailbox removes both the mailbox and the user object.
How to recursively delete a list of folders and their contents
The below command reads directory paths in a file and deletes each path including all child files and folders.
remove-item (get-content h:\folders.txt) -recurse
How to move folders to a new location
The below command reads a text file of directory paths and moves the folders to a new directory called h:\newfolder.
move-item -path (get-content h:\folders.txt) -destination h:\newfolder
How to install the Active Directory module on Win7
Download "Remote Server Administration Tools" on Win 7 [KB958830]
Then add the Window features: Remote Server Administration Tools > Role Administration Tools > AD DS and AD LDS Tools > Active Directory Module for Windows PowerShell.
Display the expiration date for users in a specific OU
get-aduser -searchbase "OU=Contractors,OU=Users,OU=billiton,DC=bhp,DC=corporate" -filter * -searchscope "base" -property accountexpirationdate | select-object -property samaccountname,accountexpirationdate
Note the -searchscope parameter. This refers to the OU search depth.
Base or 0 = Search only the current path or object.
OneLevel or 1 = Search the immediate children
Subtree or 2 = Search the current path/object and all children
Set the expiration date for AD user objects
Compile the samaccountnames for the user accounts in a text file and run the below command to set the same expiry date for each account.
get-content C:\stuff\expire.txt | set-adaccountexpiration -datetime "24/12/2016"
Remove a list of AD Computer Objects
Compile the samaccountnames for the computer accounts in a text file and run the below command to delete each one from AD.
get-content C:\stuff\computer_deletions.txt | remove-adcomputer
Note, you can add -Confirm:$false to the end of the above command to prevent confirmation prompts.
How to backup an Exchange 2010 mailbox to a pst file
Step 1 - Grant User Rights for Mailbox Exports in Exchange 2010 SP1
The first step is to grant an account the right to export mailboxes. In the Exchange Management Shell run the following command. Afterwards, close and re-open the Exchange Mgt Console otherwise you won't have permission to perform step 3.
New-ManagementRoleAssignment -Role "Mailbox Import Export" -User Administrator
Step 2 - Create a Network Share for Mailbox Exports in Exchange 2010 SP1
Next we need to create the network share that will be used as the file path for the exported PST files. All that is required here is a network share that the Exchange Trusted Subsystem group has read/write permission to.
Step 3 - Export a Mailbox with an Exchange Server SP1 Mailbox Export Request
Use New-MailboxExportRequest to start the mailbox export. The only two required parameters for the command are the file path to the export PST file, and the name of the mailbox to export.
New-MailboxExportRequest -Mailbox test.user -FilePath \\shared_folder\pst\mailbox.pst
To view the progress of your mailbox export use the below command.
Get-MailboxExportRequest
Note, the Microsoft Exchange Mailbox Replication service needs to be running in order to be able to export mailboxes. If this service does not start it may be that the Net TCP Port sharing service is disabled. You can set this service to start automatically with the below command.
Set-Service NetTcpPortSharing -StartupType Automatic
Send an email using the send-mailmessage cmdlet
The send-mailmessage cmdlet allows you to script the delivery of email. In the below example I have attached two text files using the -attachment parameter. I have also output a variable into the body of the email. Note, the variable needs to be a string eg $variable = get-content c:\stuff\file.txt | out-string
send-mailmessage -to "Graham <graham@domain.com>" -from "nick <nick@domain.com>" -subject "test mail" -smtpserver mail.domain.com -attachment "c:\stuff\file.txt","c:\stuff\file2.txt" -body $variable
How to run a powershell script as a scheduled task in Windows Server 2008 R2 and older versions
Set the action part of the scheduled task to run a script and browse to a bat file. Within the bat file call your powershell script. For example:
powershell -file c:\monitoring.ps1
The Server Manager PowerShell Module
The Server Manager Module can be used to install and remove Windows Features. To add the module type:
Import-Module servermanager
This module exports 3 cmdlets:
Get-WindowsFeature
Add-WindowsFeature
remove-WindowsFeature
Using remove-item to remove multiple files
You can specify multiple files in the same command:
remove-item -path "c:\folder1\file1.txt","c:\folder2\file2.txt"
Searching for files of a particular file type
Use the get-childitem cmdlet with a filter of "*file extension*" to find files with a particular file extension. The below example will list pst files from a particular directory if they exist.
get-childitem -path '\\hostname\c$\stuff' -recurse -filter "*.pst"
Displaying environment variables
The below command lists all current environment variables:
get-childitem env:
You can display a particular environment variable if required eg the username variable.
get-childitem env:username
Displays only the username value:
(get-childitem env:username).value
Copying a folder using the copy-item cmdlet
copy-item -path \\hostname\c$\source_folder -recurse -destination \\hostname2\c$\destination_folder
Note, the recurse parameter is necessary if you want to include child folders/files.
Restarting and powering off your PC
The stop-computer and restart-computer cmdlets can be used to poweroff and restart your computer.
Logging of PowerShell activity and the Common Parameter, Verbose
Use the start-transcript cmdlet to begin the capture. You can specify where you want the transcript saved (.txt file) using the - path parameter.
Use the stop-transcript cmdlet to end the capture.
The - verbose parameter can be specified with all cmlets. It' s useful if you want to see activities that are not normally displayed eg when used with the remove-item cmdlet, verbose will display each file that is removed.
Allow a non-privileged user to run a scheduled task that runs a batch file
The user will need to have "Log on as a batch job" rights on the computer that hosts the script. This can be configured on the local security policy of the host computer.
You can change the policy on the host under:
Administrative Tools -> Local Security Policy -> Local Policies -> User Rights Assignment -> Log On As Batch Job
Simply add the user under the Local Security Setting.
List all WMI classes under the root\cimv2 WMI namespace
Get-wmiobject - list
Prerequisites for the Windows PowerShell AD module
You will need to install the below KB for Win7 machines.
Windows6.1-KB958830-x64-RefreshPkg.msu
You will also need to enable the below features, can be done via DISM.
dism /online /enable-feature /featurename:RemoteServerAdministrationTools
dism /online /enable-feature /featurename:RemoteServerAdministrationTools-Roles
dism /online /enable-feature /featurename:RemoteServerAdministrationTools-Roles-AD
dism /online /enable-feature /featurename:RemoteServerAdministrationTools-Roles-AD-Powershell
Backing up and restoring Group Policy
First, import the group policy powershell module.
Import-Module -Name grouppolicy
The below command will backup all GPO from a DC.
Backup-GPO -All -Path \\servername\backups -Comment "weekly Backup" -Domain nickbeare.com -Server dc1
Run the below command to restore the GPO on the server:
Restore-GPO -All -Domain nickbeare.com -path \\servername\backups
Change the size and colour of a PowerShell window
Append the below to the top of your script. Note you need to run clear-host at the end to clear up the formatting.
$a = (Get-Host).UI.RawUI
$a.WindowTitle = "Insert Title Name"
$a.BackgroundColor = "green"
$a.ForegroundColor = "yellow"
$b.Width = 40
$b.Height = 10
$a.WindowSize = $b
Clear-Host
Cmdlet for searching for disabled AD accounts
Search-ADAccount -accountdisabled
Disable of list of AD user accounts
get-content c:\usernames.txt | disable-adaccount
Changing folder permissions using powershell
The below command lists permissions for a folder. You can use set-acl to change the permissions.
get-acl -path c:\stuff | format-list
Enable a user's mailbox
Add the Exchange Mgt shell:
Add-PSSnapin Microsoft.Exchange.Management.PowerShell.Admin
Enable the mailbox for the user:
enable-mailbox -identity username
Specify the database that mailbox is stored on, eg:
Database: EXCHANGE_SERVER\Storage Group 3\Mail Store DB3
Exchange 2007 SP3 Prerequisites on Windows Server 2008 R2
The below command installs the prerequisites for Hub , CAS , Mailbox - Typical Installation.
Import-Module ServerManager
Add-WindowsFeature RSAT-ADDS,Web-Server,Web-Metabase,Web-Lgcy-Mgmt-Console,Web-Dyn-Compression,Web-Windows-Auth,Web-Basic-Auth,Web-Digest-Auth,RPC-Over-HTTP-Proxy
You can also install features using the cmd prompt, eg:
ServerManagerCmd -i RSAT-ADDS
Get OS name from a computer
Get-WmiObject -class win32_operatingsystem -property * | select-object caption,__server
Show installed Windows Updates (KBs) on a computer
Get-WmiObject -Class Win32_QuickFixEngineering -ComputerName hostname
Show all local profiles on the target computer
Get-WmiObject - computername 2hspd2s -class win32_userprofile -property * | select-object localpath,sid
Delete profile with localpath like ptargetuser
Get-WmiObject -class win32_userprofile -filter "localpath like '%ptargetuser'" | Remove-WmiObject
How to remove a list of users from an AD group
Note, the -confirm:$false part just prevents confirmation messages from appearing.
Remove-ADGroupMember -identity insert_group_name -member (get-content C:\users_to_remove.txt) -confirm:$false
PowerShell remoting
Enable ps-remote:
enable-psremoting
Disable ps-remote:
Disable-PSRemoting
Establish a remote connection with a PC:
Enter-PSSession -computername jfspd2s
Show ps-remote privileges:
Get-PSSessionConfiguration | select-object -expandproperty permission
Enable ps-remote via PsExec:
C:\Pstools\PsExec.exe \\computername -s powershell Enable-PSRemoting -Force
Show all output for a property
select-object -expandproperty value
Using Where to filter results
get-service | Where-Object { $_.status .match "running" }
get-service | where-object {$_.Status -eq "Stopped"}
Using sort-object to sort results
Sorts in ascending order by default.
Sort-Object -descending -property "value"
Convert string to lower or upper case
Convert to lowercase:
$lowercase_string = $convert_me.ToLower()
Convert to uppercase:
$uppercase_string = $convert_me.ToUpper()
Removing and adding users to a group
To move the current membership of one group to another, follow the below steps:
Get the current group membership of group1:
get-adgroupmember group1 | select-object name | out-file C:\users\beare\users.txt
Assign the group members of group1 to a variable named members. Note, you may need to remove any unecessary headings from users.txt before assigning the output to the members variable.
$members = get-content C:\users\beare\users.txt
Add the members to group2:
add-adgroupmember -identity group2 -members $members
Remove the group members from group1:
Remove-ADGroupMember -identity group1 -members $members
Remotely execute a GPO update on a PC
invoke-gpupdate -force -computer remotecomputername
Moving multiple accounts to another OU and disabling them
Affected SAMAccountNames are recorded in disabled_userids.txt.
Output the displaynames of the affected users for record purposes:
get-content c:\users\disabled_userids.txt | get-aduser -property "displayname" | select-object -property "displayname", "samaccountname" | Out-File C:\Users\display_names.txt
Obtain the GUIDs for the affected users:
get-content c:\users\disabled_users.txt | get-aduser -property "objectguid" | select-object -property "objectguid" | Out-File C:\Users\guids.txt
Move the affected users to the DisabledUsers OU:
get-content c:\users\guids.txt | move-adobject -targetpath "OU=DisabledUsers,OU=Project,DC=business,DC=gov,DC=au"
Set the description field of each affected user as the relevant reference number:
get-content c:\users\guids.txt | set-aduser -Replace @{description='Reference_Number'}
Disable the accounts:
get-content c:\users\guids.txt | Disable-ADAccount
Close all processes relating to a particular program
The below line will close all active Internet Explorer processes:
Get-Process -name iexplore | stop-process
The below line will close all active Notepad processes. Can be useful when you have many instances of the program open and it would take a while to close them all via the GUI.
Get-Process -name notepad | stop-process
How to view and clear AD attributes
The below command takes a list of samaccountnames and displays the 'manager' for each one:
get-content c:\stuff\users.txt | Get-ADUser -property manager | Select-Object -Property manager
The below command clears the 'manager' attribute for each samaccountname in users.txt: get-content c:\stuff\users.txt | set-aduser -clear manager
Set a particular OU as your search base
The below command searches the separated staff OU and outputs the samaccountname and manager for each object in the OU:
get-aduser -searchbase "OU=Separated Staff,OU=BHP,DC=Billiton,DC=corporate" -filter * -property manager | select-object -property samaccountname,manager
Run Windows Server 2012 in non-GUI mode
Use the following command to view a list of the current Server GUI components running:
Get-WindowsFeature server-gui*
Give your attention to the Name column. You use this value with the Remove-WindowsFeature and Install-WindowsFeature PowerShell cmdlets.
To remove the server graphical shell, which reduces the GUI server installation to a Minimal Server Interface installation, run:
Remove-WindowsFeature Server-Gui-Shell
To remove the Graphical Management Tools and Infrastructure, which further reduces a Minimal Server Interface installation to a Server Core installation:
Remove-WindowsFeature Server-Gui-Mgmt-Infra
To remove the Graphical Management Tools and Infrastructure and the Server Graphical Shell, run:
Remove-WindowsFeature Server-Gui-Shell,Server-Gui-Mgmt-Infra
To re-add the full GUI mode you can use the below. Just ensure your source is correct:
Install-WindowsFeature server-gui-mgmt-infra,server-gui-shell -source:wim:d:\sources\install.wim:4
Show motherboard and CPU info
CPU:
Get-WmiObject Win32_Processor
Motherboard:
get-WmiObject -class Win32_Baseboard
Enable PowerShell Web Access
PSWA is a feature in Windows Server 2012 that turns a machine into a PowerShell gateway over https. To install:
Open Server Manager and add the IIS role and Windows PowerShell Web Access feature (requires .NET framework 4.5 feature).
Open an elevated PowerShell terminal and type the below command to create the PSWA page in ISS.
Install-PswaWebApplication
To give users permission to use PSWA run the below command in PowerShell. I found that the user needed to be in the local admin group to log into PSWA.
Add-PswaAuthorizationRule -UserName domain(or hostname)\username -ComputerName hostname -ConfigurationName microsoft.powershell
PSWA runs over HTTPS so you need to Create a self-signed certificate by:
Opening IIS 8, click on your server name, double click Server Certificates, click create self-signed certificate. Name the certificate and select personal.
Next you need to bind the certificate to the PSWA webpage:
Click on the default website and select bindings. Add a type of https, set IP address to All Unassigned, enter your port, leave hostname blank, don't check the require server name indication checkbox, and select the personal certificate you just created. You can select a non-standard port number if you like, but you will need to create an inbound firewall rule to allow the traffic.
I have found that you need to run the below PowerShell command otherwise you get an error when logging into PSWA - "Windows PowerShell remote management has been disabled on the destination computer"
Enable-PSRemoting -force
Accessing PSWA:
Go to https://yoursite/pswa and log in. Your username should be in the domain\user format.
Export a mailbox to a pst file
Create a bat file with the below contents and execute it to backup your mailbox to a pst file (includes mailbox, contacts, calendar etc). Also cleans up any completed mailbox export requests.
C:\Windows\System32\WindowsPowerShell\v1.0\powershell.exe -noexit -command ". 'C:\Program Files\Microsoft\Exchange Server\V14\bin\RemoteExchange.ps1'; Connect-ExchangeServer -auto; $dated = get-date -f ssddMMyyyy; $mailbox = $dated + 'username.pst'; New-MailboxExportRequest -Mailbox username -FilePath \\hostname\shared_folder\$mailbox; Get-MailboxExportRequest -status completed | Remove-MailboxExportRequest -confirm:$false
Monitoring login attempts
The below event IDs appear in the security event log and are useful for monitoring login attempts:
4625 An account failed to log on.
4624 An account was successfully logged on.
4634 An account was logged off
Use get-eventlog to look for these events. Note, the parameter instanceID is the event ID. The below command returns all failed logon attempts:
Get-EventLog -LogName Security -InstanceId 4625
From this output you can drill down into one of the events by referencing the index (event ID):
Get-EventLog -LogName Security -Index 4258789
To get further information about the event from its message property you can run the below:
(Get-EventLog -LogName Security -Index 4258789).message
Or:
$event = Get-EventLog -LogName Security -Index 4258789
$event.Message
Monitoring RDP sessions
You can run either of the below commands to view the RDP event log:
Get-WinEvent -Path 'C:\Windows\System32\winevt\Logs\Microsoft-Windows-TerminalServices-LocalSessionManager%4Operational.evtx'
Or:
Get-WinEvent -ProviderName "Microsoft-Windows-TerminalServices-LocalSessionManager"
Event IDs explained:
21 = Remote Desktop Services: Session logon succeeded:
24 = Remote Desktop Services: Session has been disconnected:
25 = Remote Desktop Services: Session reconnection succeeded:
23 = Remote Desktop Services: Session logoff succeeded:
Show successful RDP logons:
Get-WinEvent -logname "Microsoft-Windows-TerminalServices-LocalSessionManager/Operational" | where {($_.Id -eq "21")}
PowerShell equivalents to Unix Head and Tail
The below commands passed the output of a log to select-object and only returns the first 10 rows (most recent log entries):
Get-EventLog -LogName Security -InstanceId 4625 | select-object -First 10
The below command accepts the same input but returns the last 10 lines (oldest log entries):
Get-EventLog -LogName Security -InstanceId 4625 | select-object -last 10
Show the current CPU temperature in degrees Celsius
Generally, a high temperature for an AMD CPU is considered to be around 60 degrees Celsius, while an Intel CPU is considered to be hot around 70.
$temp = (Get-WmiObject -class "MSAcpi_ThermalZoneTemperature" -Namespace "root\WMI").currenttemperature ; $temp2 = ($temp - 2732) / 10.0 ; $temp2
Show remaining battery life in a motherboards BIOS battery
Get-WMIObject Win32_Battery -property EstimatedChargeRemaining
How to run gpupdate and gpresult on a remote computer
gpupdate:
Invoke-Command -Computer hostname { gpupdate /force }
gpresult:
gpresult -r /scope:computer /s hostname /user username
Show the status of specific services on multiple PCs
Add each hostname to a new line in C:\hostnames.txt. Replace service1 and 2 with the relevant ProcessName.
$computers = Get-Content C:\hostnames.txt
get-service -Name service1, service2 -computername $computers | Select-Object displayname,status,machinename | sort displayname | Format-Table -autosize
Using the filter parameter
You can use the filter parameter with some cmdlets to filter your output. For example lets say we want to only find AD users who have the word *cgi* in their description property. We can use like.
Get-ADUser -Filter "description -like '*cgi*'"
You can also find exact matches using eq.
Get-ADUser -Filter "samaccountname -eq 'pbearen'"
Show the Outlook Web App status for all mailbox users (enabled/disabled)
Get-CASMailbox | ft DisplayName, OWAEnabled | out-file c:\owa.txt
Show uptime for multiple systems
The below command shows the uptime for a list of computer names in machine.txt.
Get-WmiObject -computername (get-content c:\users\machine.txt) -class win32_operatingsystem | select-object -property csname, @{LABEL='LastBootUpTime';EXPRESSION={$_.ConverttoDateTime($_.lastbootuptime)}}
List active domain controllers in your domain
get-adgroupmember -Identity "domain controllers" | select-object -Property name
Install .NET Framework 3.5
Install-WindowsFeature Net-Framework-Core -source \\network\share\sxs
To verify installation, run the following command:
Get-WindowsFeature
Recursively list the permissions for a folder and its children
get-childitem -recurse c:\parent_folder | Get-Acl | Format-List -property path, owner, accesstostringList all installed software alphabetically
Get-WmiObject -class win32_product | Select-Object -Property name | Sort-Object -property nameGive a user or group full permission over all Group Policy Objects in the domain
First import the group policy module - import-module grouppolicyChange the TargetType from user to group when setting permissions for groups. The target name is the samaccountname (both users and groups have this). Set-GPPermissions -all -TargetName username -TargetType user -PermissionLevel gpoeditdeletemodifysecurity
Exchange cmdlets to show inbound/outbound mail size restrictions
Show the maximum sending message size for Exchange 2007/2010 send connectors:Get-sendConnector | format-list Identity,MaxMessageSize
Show the maximum receiving message size for receiving messages for Exchange 2007/2010 receive connectors:
Get-ReceiveConnector | format-list Identity,MaxMessageSize
Show the maximum receive as well as send message sizes:
Get-TransportConfig | format-list max*size
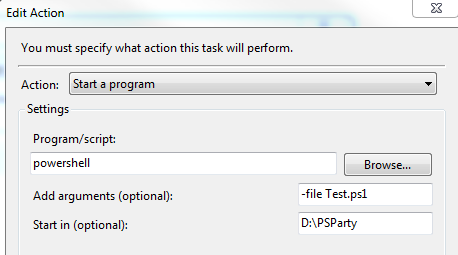
Run a PowerShell script using Task Scheduler
Find the uninstall string for software using PowerShell
In this example we search for uninstall strings for firefox:Get-ChildItem -Path HKLM:\SOFTWARE\Microsoft\Windows\CurrentVersion\Uninstall, HKLM:\SOFTWARE\Wow6432Node\Microsoft\Windows\CurrentVersion\Uninstall | Get-ItemProperty | Where-Object {$_.DisplayName -match "firefox"} | Select-Object -Property DisplayName, UninstallString
Removing computers from the domain
Remove-Computer -ComputerName hostname -UnjoinDomainCredential domain\username -verbose -Force -RestartShow PowerShell command history
You can use Get-History to show your previous commands.To run a previous command use Invoke-History x where x is the Id of the command from Get-History.
Change volume name
Use get-volume to view volume names and drive letters. To change the volume name type:Set-Volume -DriveLetter D -NewFileSystemLabel Corporate_Data
Determine which SCCM antimalware policies are applied to your computer
You can view these via the registry:HKEY_LOCAL_MACHINE\SOFTWARE\Microsoft\CCM\EPAgent\LastAppliedPolicy
Or via PowerShell:
$EmptyPolicy= @()
$EPPolicy = Get-wmiObject -namespace “Root\ccm\Policy\Machine\ActualConfig” -query “Select Name from CCM_AntiMalwarePolicyClientConfig” | ForEach-Object {$EmptyPolicy+=$_.Name}
$EmptyPolicy | Group-Object | Select-Object -Property Name –Unique
Mass move script
Get-Content C:\hostnames.txt |Foreach-Object {
$source = '\\' + $_ + '\c$\ide\eclipse_64'
$source2 = '\\' + $_ + '\c$\ide\eclipseDropins'
$destination = '\\' + $_ + '\c$\ProgramData'
move-item -verbose -path $source -destination $destination
move-item -verbose -path $source2 -destination $destination
}
TRIM log removal script
$included =@('TRIMWorkgroup*.log', 'TRIMEvent*.log')$excluded =@('*.exe*')
$target = get-childitem -path D:\HPTRIM\ServerLocalData\TRIM\Log -recurse -include $included -exclude $excluded | where { ((get-date)-$_.lastwritetime).days -ge 14}
$target | remove-item -recurse -force
get-date > c:\TRIM_Deletion_Log.txt
$target >> c:\TRIM_Deletion_Log.txt
View domain and forest function levels
Show domain functional level:Get-ADDomain | Select-Object -Property domainmode
Show forest functional level:
Get-ADforest | Select-Object -Property forestmode
Create an encrypted password and store it in a file
The below commands create an encrypted password and store it in a password.bin file.Add-Type -assembly System.Security
$passwordBytes = [System.Text.Encoding]::Unicode.GetBytes("enter_password")
$entropy = [byte[]](1,2,3,4,5)
$encrytpedData = [System.Security.Cryptography.ProtectedData]::Protect($passwordBytes, $entropy, 'CurrentUser')
$encrytpedData | Set-Content -enc byte c:\password.bin
The below commands read the encrypted file and assign the unencrypted password to the password variable.
$encrytpedData = Get-Content -enc byte c:\users\pbearen\password.bin
$entropy = [byte[]](1,2,3,4,5)
$unencrytpedData = [System.Security.Cryptography.ProtectedData]::Unprotect($encrytpedData, $entropy, 'CurrentUser')
$password = [System.Text.Encoding]::Unicode.GetString($unencrytpedData)
$password
Using Where-Object to filter results
The two below commands are separate examples of using where-object to find a particular username:get-aduser -filter * | Where-Object {$_.samaccountname -match "username"}
get-aduser -filter * | Where-Object {$_.samaccountname -like "*username*"
Using Where-Object
Where-Object can be used to filter results. In the below example I am using two different ways to filter the output to show only KB2718695 if it exists.:Get-HotFix | Where-Object {$_.hotfixid -like '*2718695*'}
OR
Get-HotFix | Where-Object -property hotfixid -like '*2718695*'
However, when you want to add a Boolean condition you need to use the placeholder method eg $_.property_name
Get-Service | Where-Object {$_.status -Match 'running' -and $_.displayname -like '*spool*'}
Using Where-Object to filter results on multiple boolean conditions
Note, the matches are case insensitive ie BHP will return instances of bhp.get-aduser -Properties company | where-object {$_.company -match 'BHP' -or $_.company -match 'WOW' -or $_.company -match 'Coles'} | Select-Object -Property samaccountname, company | Sort-Object -Property company
Filtering results using -Filter
You can use -Filter instead of where-object to filter results. You actually need to use -filter when piping output into a cmdlet like set-adaccountexpiration (where-object doesn't work).get-aduser -Filter {company -eq 'WOW' -or company -eq 'BHP' -or company -eq 'peoplebank'} | Set-ADAccountExpiration -DateTime "DD/MM/YYYY"
Determine OS
Get-WmiObject -class win32_operatingsystem | Select-Object -Property nameAdd a DNS A record
The below command adds an A record for serverA with an IP address of 192.168.1.2 in the nickbeare.com forward lookup zone:Add-DnsServerResourceRecordA -Name serverA -ZoneName nickbeare.com -IPv4Address 192.168.1.2
Display and clear client DNS cache
Show all locally cached DNS entries:get-dnsclientcache
Clear all locally cached DNS entries:
Clear-DnsClientCache
List all shares on a PC
Get-wmiobject -class win32_share -ComputerName hostnameShow the time on a remote PC
Get-wmiobject -class win32_operatingsystem -property localdatetime -ComputerName hostnameThe ANR property
Anr is an AD object property that returns several values including distinguishedname, name, objectclass, objectguid. You can return it using PowerShell and cmd.exe:Get-adobject –ldapfilter “(anr=username)”
OR
Dsquery * -filter “(anr=username)”
List a remote computers IP address
get-wmiobject -class win32_networkadapterconfiguration -filter "ipenabled=$true" -ComputerName hostnameAdding firewall rules with PowerShell
There are a few ways to do this, just run get-command -noun *firewall* to view methods.
One way is via port and protocol:
New-NetFirewallRule -DisplayName "Block Outbound Port 80" -Direction Outbound –LocalPort 80 -Protocol TCP -Action Block
Another way is via display group name (this rules allow the firewall MMC):
Enable-NetFirewallRule -DisplayGroup ”Windows Firewall Remote Management”
Using Hashtables to rename properties
Hashtables can be constructed using select-object and format-table eg:get-aduser -Identity admin_user | format-table -Property @{l='nickname';e={$_.name}}, @{l='Identifier';e={$_.sid}}
get-aduser -Identity admin_user | select-object -Property @{l='nickname';e={$_.name}}, @{l='Identifier';e={$_.sid}}
The where-object filterscript parameter
Get-ADUser -filter * | Where-Object -FilterScript {$_.name -eq 'pbearenadmin' -and $_.objectclass -eq 'user'}Quest AD Module Commands
Show all DCs:get-QADComputer -computerRole 'DomainController' | select-object -Property name, osversion, osname
Show all computer objects in an OU:
get-QADComputer -Searchroot "ou=computers,dc=csu,dc=edu,dc=au" | select-object name, osversion, operatingsystem
Show all groups a user is a member of:
Get-QADMemberOf -identity username
Show all users in an OU:
Get-QADUser -SearchRoot "ou=users,dc=csu,dc=edu,dc=au" | Select-Object -property samaccountname, email, accountisdisabled, homedirectory
Filtering with Where-Object:
Get-QADMemberOf -identity username | Where-Object -FilterScript {$_.name -eq 'domain users'}
Sorting results:
Get-QADMemberOf -identity username | Sort-Object -Property name -descending
Filtering and counting results from an OU:
Get-QADUser -SearchRoot "ou=users,dc=csu,dc=edu,dc=au" | select-object -property samaccountname, email, accountisdisabled | Where-Object -FilterScript {$_.accountisdisabled -ne 'True'} | Measure-Object
Count all DCs:
Get-QADGroupMember -Identity 'domain controllers' | Measure-Object
Find domain controllers according to name:
Get-QADGroupMember -Identity "domain controllers" | Sort-Object -Property name |
where-object -FilterScript {$_.name -like 'DNO*'}
Show all object attributes and their values:
Get-QADUser JSmith -IncludeAllProperties -SerializeValues | Format-List
Show all object attributes, but not their values:
Get-QADUser -IncludeAllProperties -ReturnPropertyNamesOnly
Return a count of disabled accounts in the entire domain (note use -sizelimit x to return x number of results):
Get-QADUser -DontUseDefaultIncludedProperties -sizelimit 0 | Select-Object -Property accountisdisabled | Where-Object -FilterScript {$_.accountisdisabled -eq 'true'} | Measure-Object
Return a count of enabled accounts in the entire domain (note use -sizelimit x to return x number of results):
Get-QADUser -DontUseDefaultIncludedProperties -sizelimit 0 | Select-Object -Property accountisdisabled | Where-Object -FilterScript {$_.accountisdisabled -ne 'true'} | Measure-Object
Mass Ping Script
The below commands can be used to ping a subnet and record responses from hosts. In this example 192.168.100.1-254 is pinged.
$ping = New-Object System.Net.Networkinformation.Ping
1..254 | % { $ping.send(“192.168.100.$_”) | select-object -property address, status }
Foreach loop that removes members from group
$members = get-content c:\temp\members.txtforeach ($member in $members)
{
get-qadcomputer -identity $member | select-object -expandproperty DN | remove-qadgroupmember -identity 'CN=groupname,OU=groups,DC=corp,DC=bhp,DC=au' -whatif -verbose
}
Move computer objects to an OU
$members = get-content c:\temp\members.txtforeach ($member in $members)
{
get-qadcomputer -identity $member | select-object -expandproperty DN | move-QADObject -NewParentContainer 'bhp.mil.au/old_pcs' -verbose
}
Find deleted objects using the Quest AD Module
The modification date/time reflects when the object was deleted:Get-QADUser -Tombstone -Name username* | Select-Object -Property *
Creating bulk A, PTR, and CNAME records
$records = Import-Csv -path “c:\records.csv”foreach ($record in $records)
{
dnscmd coredc1 /recordadd $record.Zone $record.NodeName $record.RRType $record.RRData
}
Input file records.csv
NodeName,RRData,Zone,RRType
beare1,192.168.1.140,lucasbeare.local,A
140,beare1.lucasbeare.local,1.168.192.in-addr.arpa,PTR
aliasname,DININGROOM.lucasbeare.local,lucasbeare.local,CNAME
Create DNS A + PTR records in bulk using PowerShell
The below script can be used to create DNS A records and their associated PTR records. Sample input file format below:
NodeName,RRData,Zone
beare1,192.168.1.140,lucasbeare.local
$records = Import-Csv -path c:\new.csv
foreach ($record in $records)
{
Add-DNSServerResourceRecordA -computername DNS_Server_Name -name $record.nodename -zonename $record.zone -createptr -ipv4address $record.RRData -verbose
}
Removing DNS records in bulk using PowerShell
The below script can be used to remove DNS records of any type. Sample input file below:
NodeName,RRData,Zone,RRType
140,beare1.lucasbeare.local,1.168.192.in-addr.arpa,PTR
$records = Import-Csv -path c:\old.csv
foreach ($record in $records)
{
Remove-DNSServerResourceRecord -computername DNS_Server_Name -name $record.nodename -zonename $record.zone -recorddata $record.RRData -RRType $record.RRType -confirm:$false -force -verbose
}
Creating bulk forward and reverse lookup zones
$zones = get-content “c:\zones.txt”foreach ($zone in $zones)
{
dnscmd coredc1 /zoneadd $zone /DSPrimary
}
Input file zones.txt
blues.com
2.168.192.in-addr.arpa
wheels.com
3.168.192.in-addr.arpa
The /zoneadd switch is smart enough to detect reverse lookup zones by name (*.in-addr.arp) and create them accordingly.
For a primary zone use /Primary. /DSPrimary is for AD Integrated.
View pwdlastset attribute with Quest AD Module
To view pwdlastset you need to make it an included property:get-content c:\temp\expired_computers.txt | get-qadcomputer -includedproperties pwdlastset | select-object -property name, pwdlastset | export-csv -path c:\temp\comps_4.csv -notype
Extracting user object information using the Quest AD Module
input.txt holds one username per line.get-content 'c:\input.txt' | get-qaduser -searchroot "ou=Accounts,DC=test,DC=local" | select-object -property firstname, lastname, accountexpires, accountexpirationstatus, name, accountisdisabled, dn | export-csv -path 'c:\output.csv' -notype
List object group membership using the Quest AD Module
Show the expanded group membership of an AD object (user, group, computer). Output is in CSV format with one object name and group name per line. The indirect parameter shows nested group membership. The input file is a text file with one object name per line.
function GetInfo($objects) {
foreach ($object in $objects)
{
$membership = get-qadmemberof -identity $object -indirect $memberShip | %{
$properties = @{
objectName = $object
memberOfName = $_.Name
}
$infoObject = new-object psobject -property $properties
$infoObject
}
}
}
$objects = get-content -path 'C:\temp\names.txt'
remove-item c:\temp\info.csv
GetInfo $objects | export-csv c:\temp\info.csv -noclobber -notypeinfo
List members of multiple groups using the Quest AD Module
Show the members of multiple groups. Output is in CSV format with one group name and user (member) per line. The indirect parameter shows users who are a member of the group via a nested group. The input file is a text file with one username per line.
function GetInfo($objects) {
foreach ($object in $objects)
{
$membership = get-qadgroupmember -identity $object -indirect $memberShip | %{
$properties = @{
objectName = $object
memberOfName = $_.Name
}
$infoObject = new-object psobject -property $properties
$infoObject
}
}
}
$objects = get-content -path 'C:\temp\names.txt'
remove-item c:\temp\info.csv
GetInfo $objects | export-csv c:\temp\info.csv -noclobber -notypeinfo
Bulk creating groups
Method 1. DN is the OU where you want to put the groups. Input file contains group name and description columns.
$DN = 'OU=TST,DC=BHP,DC=mil,DC=au'
$groups = Import-Csv -path “c:\temp\groups.csv”
foreach ($group in $groups)
{
dsadd group ("CN=$($group.name.trim()),$($DN)") -secgrp yes -scope g -desc $group.description
}
Method 2.
$groups = import-csv -path c:\temp\members.csv
foreach ($group in $groups)
{
New-ADGroup -Path "OU=AccountDeptOU,DC=AppNC" -Name $group.name -GroupScope DomainLocal -GroupCategory Security -Description $group.description
}
User Creation Script - Includes adding group membership based on a sample user
$DN = 'OU=BHP,DC=bhp,DC=corp,DC=au'$upn = '@bhp.corp.au'
$users = Import-Csv -path "c:\temp\users.csv"
foreach ($user in $users)
{
$UserDN = ("CN=$($user.name.trim()),$($DN)")
$props = @('user', $UserDN, '-samid', $user.name, '-upn', "$($user.name)$($upn)", '-pwd', $user.password, '-mustchpwd', 'yes', '-desc', $user.description, '-display', $user.name )
dsadd @props
dsquery user -samid sample.user | dsget user -memberOf | dsmod group -addmbr $UserDN -c
}
Service Account Creation Script
$DN = 'OU=Accounts,DC=info,DC=net'$upn = '@info.net'
$users = Import-Csv -path "c:\temp\service3.csv"
foreach ($user in $users)
{
$props = @('user', ("CN=$($user.name.trim()),$($DN)"), '-samid', $user.name, '-upn', "$($user.name)$($upn)", '-disabled', 'no', '-pwd', $user.password, '-mustchpwd', 'no', '-desc', $user.description, '-pwdneverexpires', 'yes', '-canchpwd', 'no', '-display', $user.displayname )
dsadd @props
}
Add DHCP reservations in bulk
$members = import-csv -path c:\temp\dhcp2.csvforeach ($member in $members)
{
netsh dhcp Server $member.server Scope $member.scope Add reservedip $member.ip $member.mac $member.name $member.comment
}
Sample input file (csv):
server,scope,name,mac,ip,comment
192.168.1.1,192.168.1.0,computer1,FFFFFFFFFFFF,192.168.1.2,Admin_Workstation
List all groups in an OU
Get-ADGroup -SearchBase "OU=Groups,DC=bhp,DC=com" -filter * -Properties name | Select-Object -Property name | Export-Csv -Path C:\temp\groups.csvAdd a member to a list of groups
In this example the Domain Admin group is added to each group in groups_v2.txt.
$groups = get-content -path c:\temp\groups_v2.txt
foreach ($group in $groups)
{
Add-ADGroupMember -Identity $group -Members 'Domain Admins' -verbose
}
Bulk renaming groups using Quest
The below script takes a list of old and new group names and renames each group's names (samaccountname and object name).$groups = import-csv -path c:\temp\groups.csv
foreach ($group in $groups)
{
rename-qadobject -identity $group.old -newname $group.new -verbose
get-qadgroup -identity $group.old | set-qadgroup -displayname $group.new -samaccountname $group.new -verbose
}
Create new active computer objects and place them in an OU
$OU = "OU=Desktops,DC=Domain,DC=Com"$computers = Import-Csv -Path C:\computers.csv
foreach ($computer in $computers)
{
$DNSHostName = $computer.name+".DOMAIN.COM"
New-ADComputer -Name $computer.name -Path $OU -DNSHostName $DNSHostName -Enabled $true -Verbose
}
Search for a group policy by name
Get-GPO -all | Where-Object {$_.displayname -like "*example*"}Export DHCP scope details
The below command queries dhcpserver and exports to CSV, details on any scopes containing the name "scope name".Get-dhcpserverv4scope –computername dhcpserver | where-object {$_.name –like “*scope name*” | export-csv –path c:\temp\file.csv
Return the first 3 letters of a string and assign to a variable.
[PS] C:\>$computerabcdefg
[PS] C:\>$computer.substring(0,3)
abc
[PS] C:\>$pc = $computer.substring(0,3)
[PS] C:\>$pc
abc
Removing a specific character from a string
To remove " from a string:$quoteless_ou = $ou.trim('"')
You can also use trimstart() and trimend() to remove from the start or end of a string respectively.
Move computers to their respective OU
Script was used to move computers back to their correct OU. The correct OU being the first three letters of the computer's name.
start-transcript
$computers = get-content c:\temp\nicks_comps.txt
foreach ($computer in $computers)
{
$three = $computer.Trim().Substring(0,3)
$ou = dsquery ou -name $three
$quoteless_ou = $ou.trim('"')
get-qadcomputer -identity $computer | select-object -expandproperty DN | move-QADObject -NewParentContainer $quoteless_ou -verbose
}
stop-transcript
Script used to reset training accounts
$users = get-content c:\AD_Reporting\users.txtforeach ($user in $users)
{
set-qaduser -identity $user -userpassword 'insert_password' -UserMustChangePassword $true -description 'insert_description' -AccountExpires $null -verbose
unlock-QADUser -identity $user -verbose
enable-qaduser -identity $user -verbose
$homez = '\\server\share\' + $user + "\*" remove-item -force -recurse -path $homez -verbose
}
Script that uses an array to produce a user status report
$BHP_persons = dsquery group -name "group_name" /domain bhp.com | dsget group -members -expand -c | dsget user -samid -c$date = get-date -format ddMMyyyy
$date2 = "BHP_" + $date
$headings = " Account_Name Expiration_Date Disabled"
echo $headings > C:\BHP_Reporting\$date2.csv
$myarray = @()
foreach ($person in $BHP_persons)
{
$priv_person = $person.trim() + "_admin"
$myarray += $priv_person | dsquery user -name $priv_person /domain domain.local | dsget user -samid -disabled -acctexpires -c
$myarray[1] | out-file C:\BHP_Reporting\$date2.csv -Append
$myarray= @()
}
Send-MailMessage -To insert_email_address -From insert_email_address -Subject "BHP Account Report" -SmtpServer insert_smtp_server -Attachments C:\BHP_Reporting\$date2.csv -Body "Insert Message Text Here."
Disable or enable a list of computer objects
$computers = get-content c:\scripts\disable_computers.txtforeach ($computer in $computers)
{
dsquery computer -name $computer | dsmod computer -disabled yes
}
# -disabled no enables a computer.
Calling the quest module using a scheduled task
Create a batch file that calls the powershell script ie:powershell -command "& 'C:\Scripts\script.ps1'"
In your powershell script you will need the below code at the top to call the quest module:
Add-PSSnapin Quest.ActiveRoles.ADManagement
Bulk computer object deletion script
$computers = get-content c:\scripts\comps.txtforeach ($computer in $computers)
{
dsquery computer -name $computer | dsrm -noprompt
}
AD Module Computer Object Deletion Script
The below script can be used to scan for computer object names containing specific serial numbers in particular OUs. It then deletes them.
Import-module –name activedirectory
$serials = get-content –path serial_numbers.txt
Foreach ($serial in $serials)
{
$computer = “*serial*”
Get-adcomputer –filter {name –like $computer} – searchbase “OU=test,DC=domain,DC=com” –searchscope subtree | remove-adobject –verbose –recursive –confirm:$false
Get-adcomputer –filter {name –like $computer} – searchbase “OU=tes2,DC=domain,DC=com” –searchscope subtree | remove-adobject –verbose –recursive –confirm:$false
#repeat lines for other OUs
}
DC NTP Check Script
The below script run be use to check that the time across all DCs in a domain is consistant. $array = "Running NTP Check...", ($date = (get-date | Out-String).trim())
$dcs = dsquery server -o rdn
foreach ($dc in $dcs)
{
$array += w32tm /monitor /computers:$dc | Where-Object {$_ -match 'NTP:' -or $_ -match $dc}
}
$array | out-file Monitor.txt
Link GPOs to particular OUs
The below script can be used to link multiple GPOs to given OUs (and enable the links). Just make sure that the GPOs in the input file match their displayname. $gpos = Get-Content -Path gpos.txt
foreach ($gpo in $gpos)
{
new-gplink -name $gpo -target "OU=sample,DC=DOMAIN,DC=COM" -linkenabled yes
new-gplink -name $gpo -target "OU=sample2,DC=DOMAIN,DC=COM" -linkenabled yes
}
Append loop output to a CSV file without the -append switch
In export-csv the -append switch is not available in earlier version of powershell. However, you can still append foreach output into a CSV file using an array. $target = @()
$peeps = import-csv -path names.csv
foreach ($peep in $peeps)
{
$target += get-qaduser -identity $peep.old_username -IncludedProperties profilepath, homedirectory | Select-Object -Property samaccountname, mail, userprincipalname, homedirectory, profilepath
}
$target | export-csv -path validated_names.csv -notypeinfo
Assigning permissions to all group policy objects using powershell
The below example grants authenticated users read access to all GPOs.Get-GPO -All | select-object -property displayname | Set-GPPermissions -TargetName "Authenticated Users" -TargetType Group -PermissionLevel GpoRead -verbose -confirm:$false
Turning off the Windows Firewall with PowerShell
You can turn off domain, private and public firewalls:Set-NetFirewallProfile -Profile Domain,Public,Private -Enabled False
Allowing MMCs to access Server Core
By default, the firewall settings in Server Core block all MMCs such as services.msc, compmgmt.msc and Windows Explorer.
Enable-NetFirewallRule -DisplayGroup "Windows Firewall Remote Management"
Enable-NetFirewallRule -DisplayGroup "Remote Service Management"
Check if DCs have DHCP Scavenging enabled
$dcs = dsquery server -o rdn /domain bhp.comforeach ($dc in $dcs)
{
$output = dnscmd $dc /info
$string = $output | select-string "scavenging"
write-host $dc
write-host $string
write-host ""
}
Another way to do csv output
$users = import-csv -path file.csvforeach ($user in $users)
{
$user_check = get-qaduser -sizelimit 0 -identity $user.name -includedproperties accountisdisabled, homedirectory, profilepath, samaccountname, lastlogontimestamp | select-object -property HomeDirectory, profilepath, samaccountname, accountisdisabled, lastlogontimestamp
$output = $user.name + ',' + $user.lastwritetime + ',' + $user_check.samaccountname + ',' + $user_check.homedirectory + ',' + $user_check.profilepath + ',' + $user_check.accountisdisabled + ',' + $user_check.lastlogontimestamp
$output | out-file output.csv -append
}
Show Network Adapter Config
Useful for showing IP config info on a remote host such as DHCP server:Get-wmiobject –class win32_networkadapterconfiguration –filter IPEnabled=TRUE –computername hostname | select-object –property *
Show all environment variables in powershell
Get-ChildItem env:Find a particular one:
Get-ChildItem env:logonserver
Or:
$env:logonserver
Shutdown script to use when WinRM is disabled/blocked
Substitute -s for -r to do a reboot.
$computers = get-content c:\scripts\computers.txt
foreach ($computer in $computers)
{
shutdown.exe -m $computer -s -f -t 0
}
Scheduling jobs with PowerShell
Below is a simple job that runs once at 2am and starts up a VM.$trigger = New-JobTrigger -once -at 2:00
Register-ScheduledJob -Name Turn_VM_On -Trigger $trigger -ScriptBlock {start-vm -name vm_name}
View NTFS permissions on a folder using PowerShell
Get-acl –path \\hostname\c$\share | select-object -expandproperty access | select-object –property identityreference, accesscontroltype, filesystemrightsSee if a KB is installed on your Domain Controllers
The below commands scan all the DCs in your domain and check to see if KB3111561 is installed:
$dcs = Get-ADDomainController -Filter * | Select-Object -expandProperty name
foreach ($dc in $dcs) { Get-HotFix -computername $dc -Id KB3111561 }
Run a PowerShell script using a Scheduled Task
In the program/script section of the action user PowerShell to run you script, see below:Powershell –file “c:\temp\something.ps1”
Finding which DHCP server a scope is hosted on
You can use the below script to scan all authorised DHCP servers in the domain and search for a DHCP scope. In the below example the search is conducted on the scope's name, but you could also use the subnet or scope ID ie 192.168.1.0 (use .scopeid instead of .name).
$servers = get-dhcpserverInDC | select-object -expandproperty dnsname
foreach ($server in $servers)
{
Write-host $computer
Get-dhcpserverv4scope –computername $server | where-object {$_.name –like “*Sydney*”} | format-table –auto
}
Bulk DHCP Scope Creation Script
Sample input file below. The top row are headings, the second row is where you put the scope data: name,startrange,endrange,subnetmask,description,cnname,192.168.1.2,192.168.1.254,255.255.255.0,desc,server PowerShell Script:
$scopes = import-csv -path c:\dhcp.csv

foreach ($scope in $scopes)

{

Add-DhcpServerv4Scope -Name $scope.name -StartRange $scope.startrange -EndRange $scope.endrange -SubnetMask $scope.subnetmask -Description $scope.description –cn $scope.cn -verbose -whatif

}
Uptimer - calculate the boot time of Windows hosts
List your Windows hostnames in comps.txt:
$comps = get-content -path c:\temp\comps.txt

foreach ($comp in $comps)

{

write-host $comp

systeminfo /s $comp | select-string "Time:"

}
How to verify TCP port connectivity on Windows without using Telnet
In PowerShell you can use the below. Replace x.x.x.x with the destination IP address, and 53 with the desired port number. If the command runs successfully then the port is open. You can verify this with $socket. If the port is closed the command will error out.
$socket = New-Object system.net.sockets.tcpclient ("x.x.x.x","53")
SCOM Maintenance Mode Script
The below scripts can be used to put multiple computers into maintenance mode in SCOM. All files reside in the same directory, in this case C:\script_location.Create a text file with the hostnames (hostnames.txt) you would like to put into SCOM maintenance mode.
hostname1
hostname2
etc Run the below batch file to read the above input file. It will execute the below PowerShell script. You may want to change the duration in the batch file, it is in minutes ie the example below will put computers into maintenance mode for 30 minutes.
powershell -file c:\script_location\MaintMode.ps1 -FileName hostnames.txt -Duration 30
pause The below PowerShell script puts the hostnames in maintenance mode. You will need to sub in your values for path, domain and new-SCOMManagementGroupConnection computername.
########################################################################
# PS C:\script_location> .\MaintMode.ps1 -FileName hostnames.txt -Duration 10
########################################################################
# Functions
########################################################################
#####################################
# Module
#####################################
param(
[string]$FileName,
[string]$Duration
)
Import-Module OperationsManager
new-SCOMManagementGroupConnection -ComputerName insert_scom_server_name
#####################################
# Script
#####################################
$path = "C:\script_location"
$domain = "bhp.mil.au"
#####################################
# Params
#####################################
#Get Server list
$MyFile = Get-content "$path\$Filename"
$MyFile
foreach($srv in $MyFile)
{
Write-host "ServerName : $srv"
$startTime = [DateTime]::Now
$endTime = $startTime.AddMinutes($Duration)
$srv += ".$domain"
$Class = get-SCOMclass | where-object {$_.Name -eq "Microsoft.Windows.Computer"};
$Instance = Get-SCOMClassInstance -Class $Class | Where-Object {$_.Displayname -eq "$srv"};
Start-SCOMMaintenanceMode -Instance $Instance -Reason "PlannedOther" -EndTime $endTime -Comment "Scheduled Maintenance Window"
}